Custom Cypress Command Examples
cy.createTransaction()
This custom command exists to create a transaction without using the UI. Since we already have a test that makes a transaction via the UI, we can use this command to complete a transaction much faster.
Located in cypress/support/commands.ts .
Cypress.Commands.add("createTransaction", (payload) => {
  const log = Cypress.log({
    name: "createTransaction",
    displayName: "CREATE TRANSACTION",
    message: [
      `💸 (${payload.transactionType}): ${payload.sender.id} <> ${payload.receiver.id}`,
    ],
    // @ts-ignore
    autoEnd: false,
    consoleProps() {
      return payload
    },
  })

  return cy
    .window({ log: false })
    .then((win) => {
      log.snapshot("before")
      win.createTransactionService.send("SET_USERS", payload)

      const createPayload = pick(
        ["amount", "description", "transactionType"],
        payload
      )

      return win.createTransactionService.send("CREATE", {
        ...createPayload,
        senderId: payload.sender.id,
        receiverId: payload.receiver.id,
      })
    })
    .then(() => {
      log.snapshot("after")
      log.end()
    })
})
First, we use Cypress.log() to log out some custom information to the Cypress Command Log.
const log = Cypress.log({
  name: "createTransaction",
  displayName: "CREATE TRANSACTION",
  message: [
    `💸 (${payload.transactionType}): ${payload.sender.id} <> ${payload.receiver.id}`,
  ],
  // @ts-ignore
  autoEnd: false,
  consoleProps() {
    return payload
  },
})
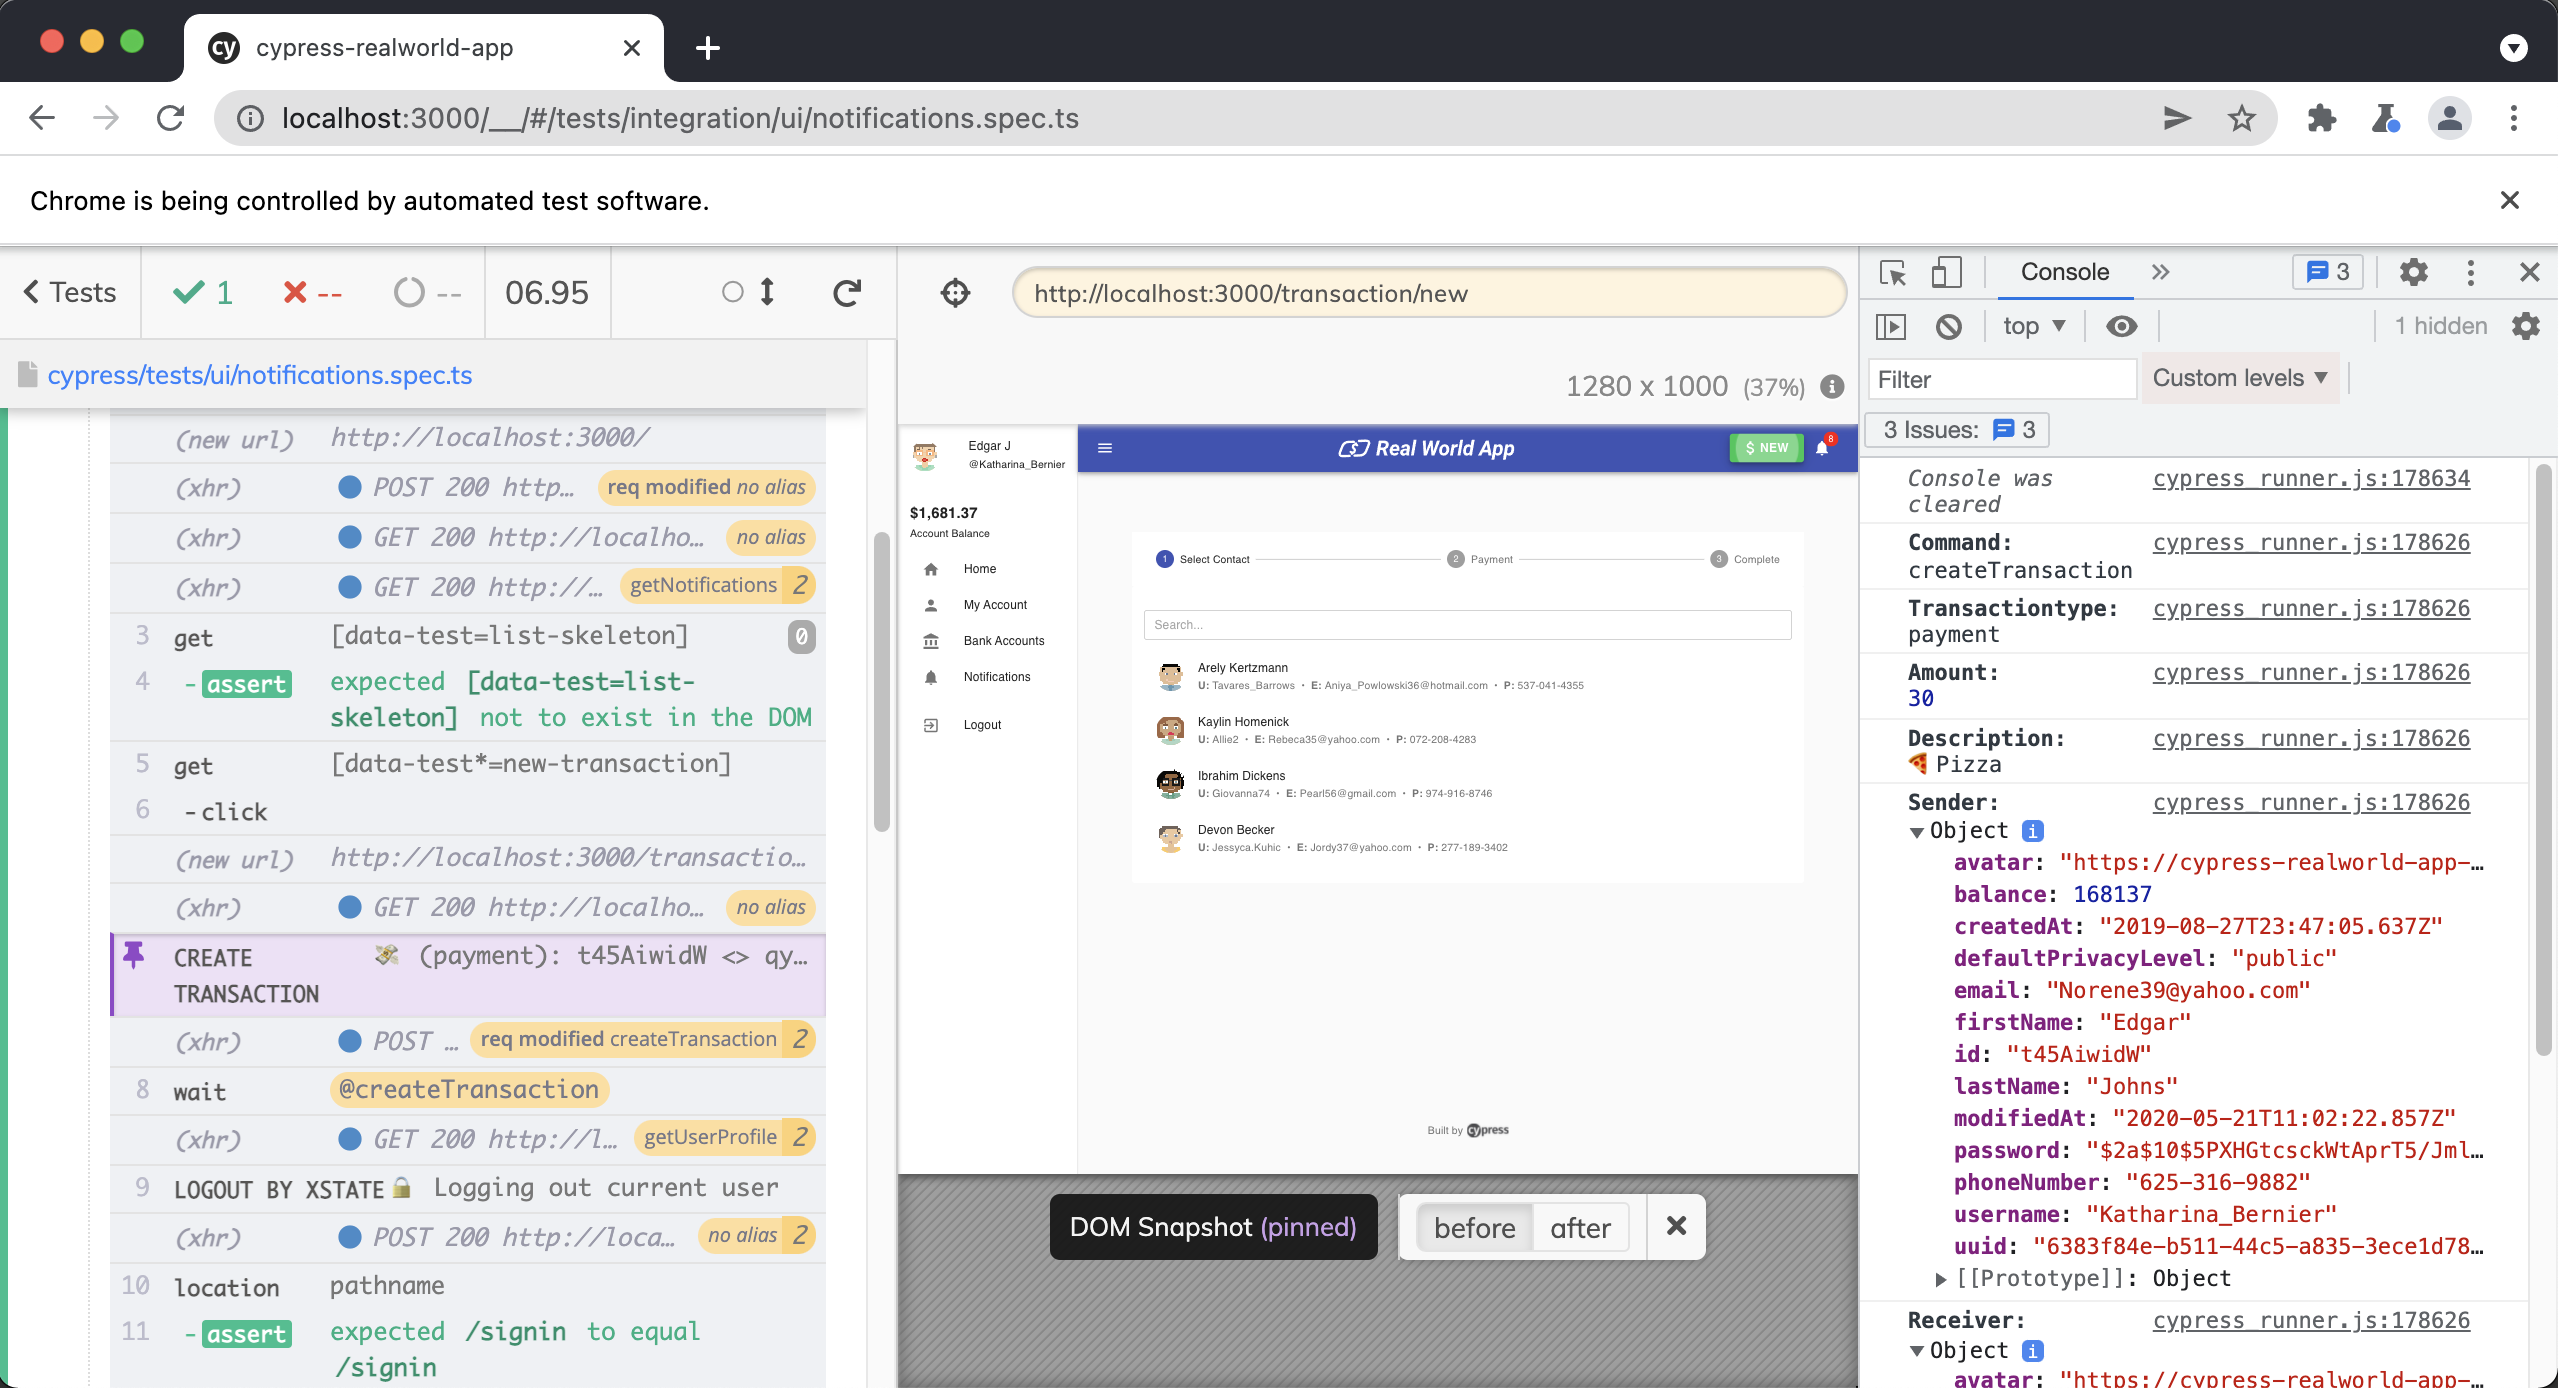
Next, we use cy.window() to grab the window object from the browser. Then we take a DOM snapshot and send the SET_USERS action to the createTransactionService from Xstate. We intentionally expose this service to the window object so that Cypress has access to it.
This service comes from the createTransactionMachine located at src/machines/createTransactionMachine.ts .
return cy
    .window({ log: false })
    .then((win) => {
      log.snapshot("before");
      win.createTransactionService.send("SET_USERS", payload);
We then create the payload for our transaction. Pick is a method from Lodash.
const createPayload = pick(
  ["amount", "description", "transactionType"],
  payload
)
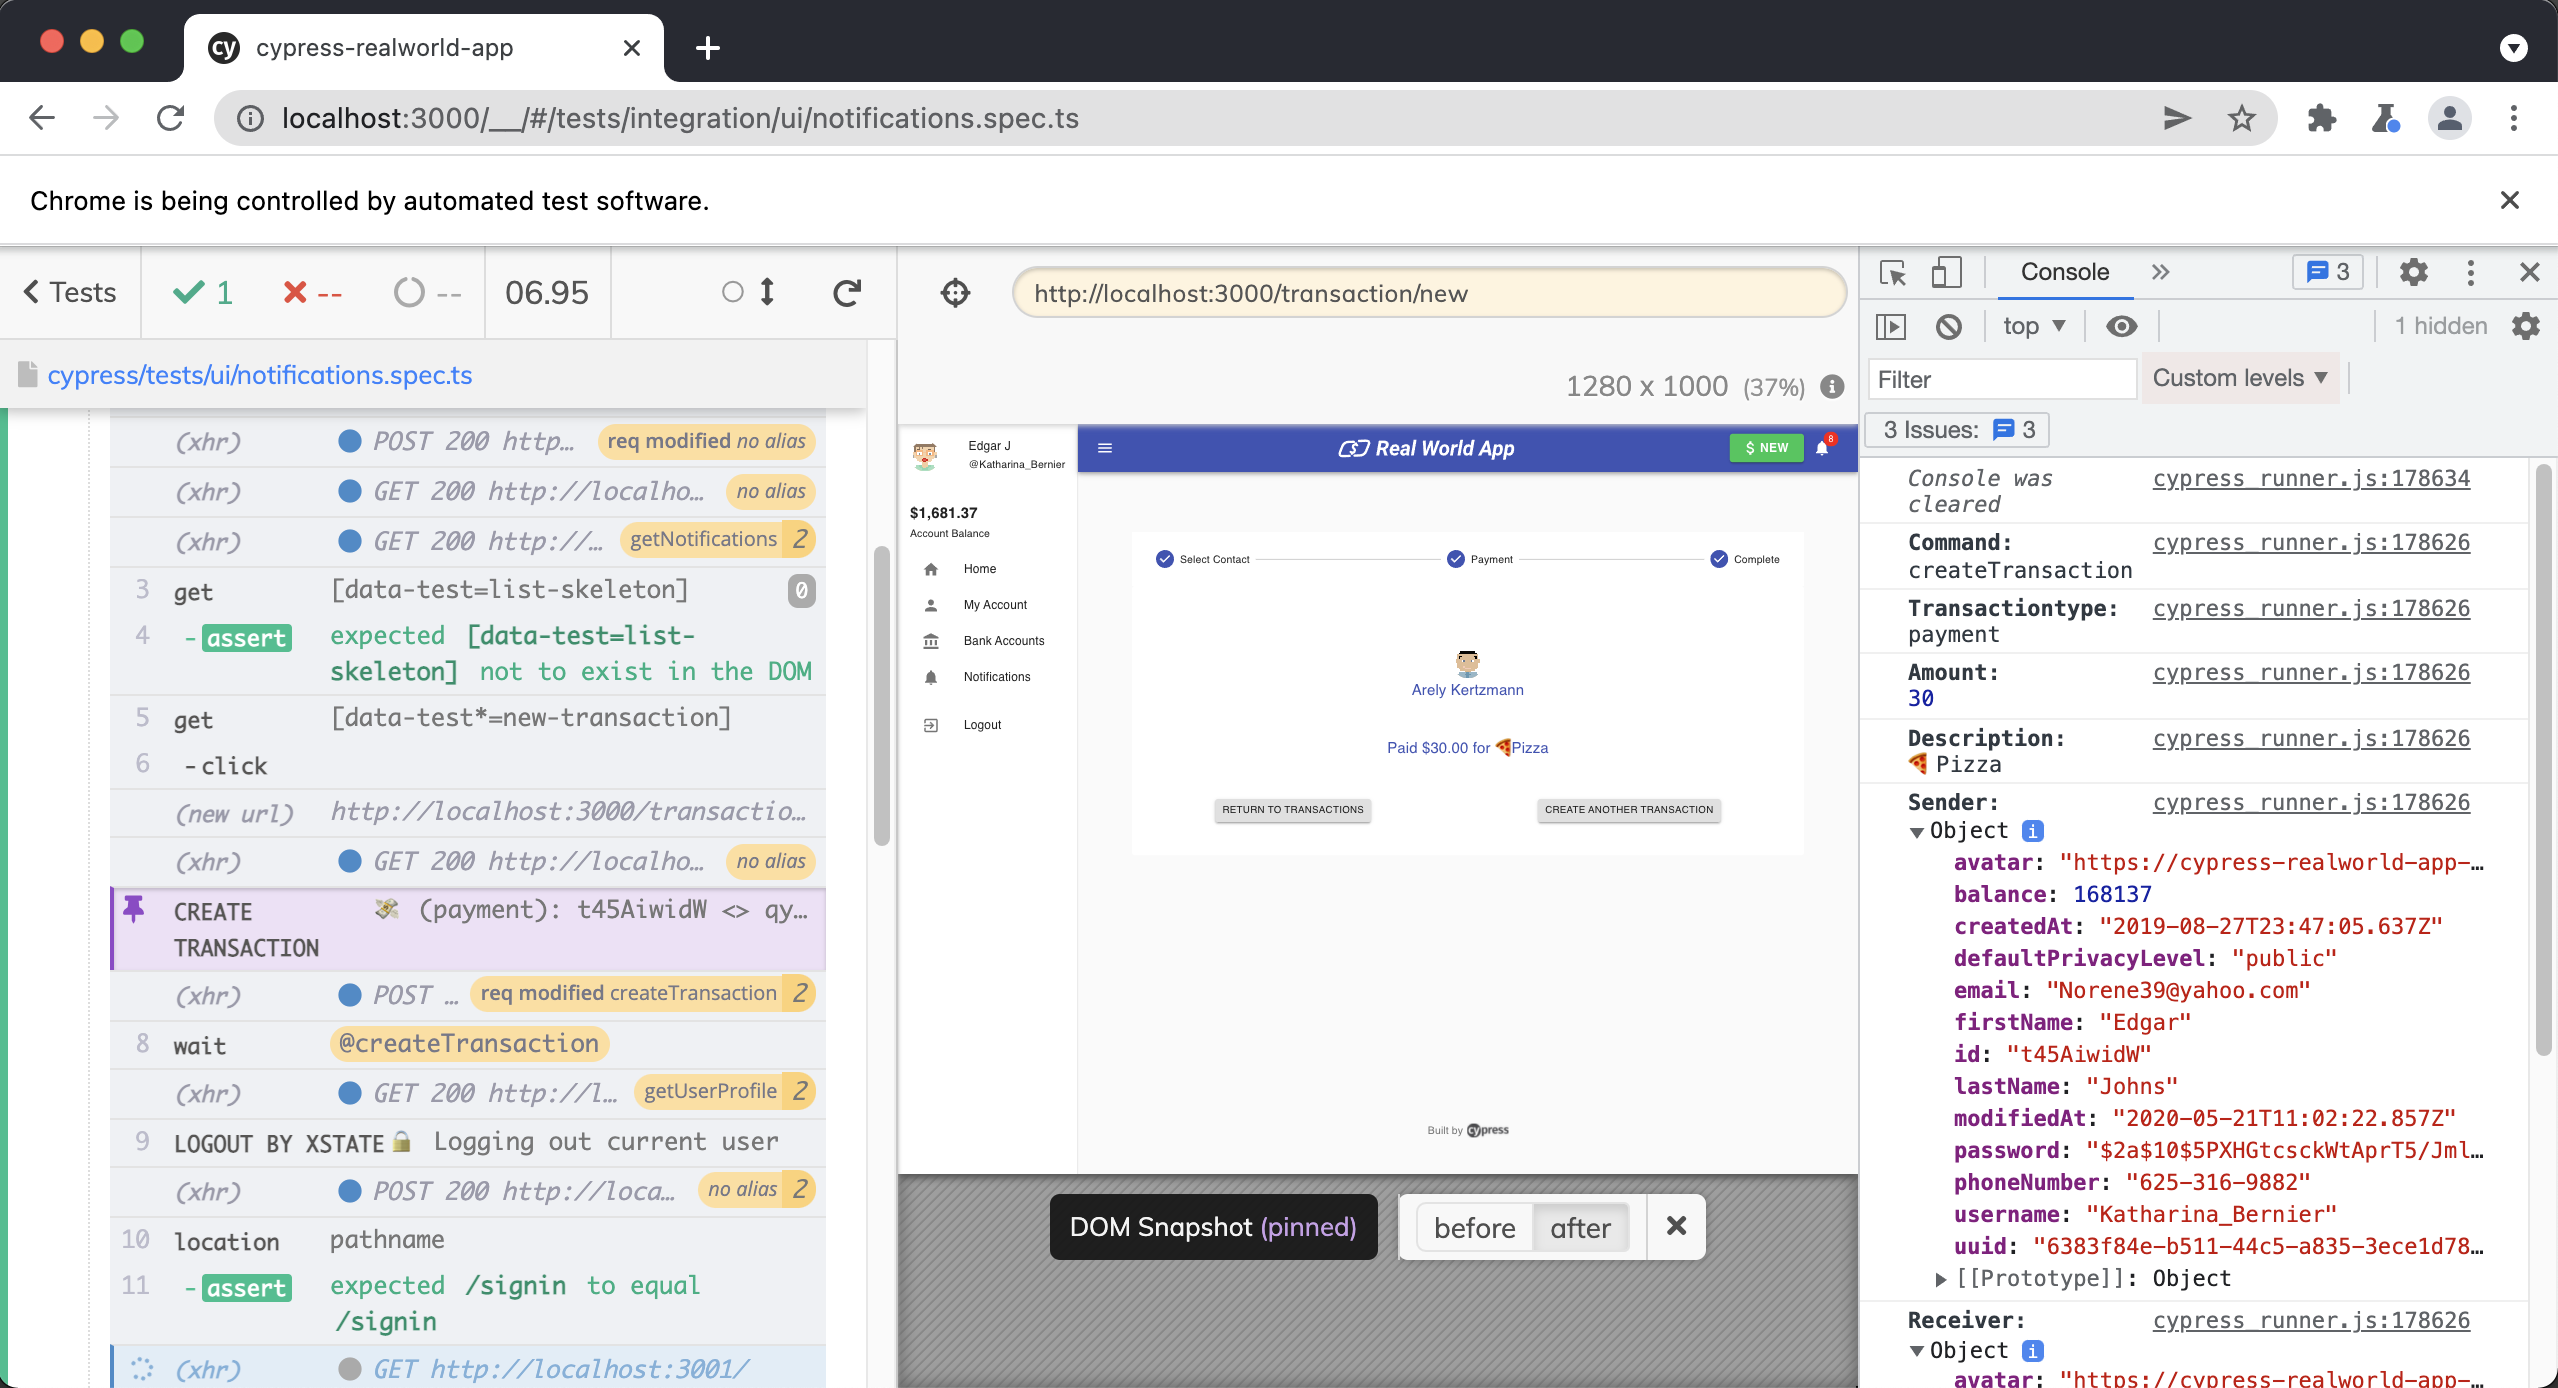
Then we send the CREATE action in the createTransactionService to create the transaction.
return win.createTransactionService.send("CREATE", {
  ...createPayload,
  senderId: payload.sender.id,
  receiverId: payload.receiver.id,
})
Finally, we take one final DOM snapshot.
.then(() => {
      log.snapshot("after");
      log.end();
    });
cy.database()
This command is responsible for retrieving data from the database in the RWA. Often we will use the data returned from this command to drive our tests.
Located in cypress/support/commands.ts .
Cypress.Commands.add(
  "database",
  (operation, entity, query, logTask = false) => {
    const params = {
      entity,
      query,
    }

    const log = Cypress.log({
      name: "database",
      displayName: "DATABASE",
      message: [`🔎 ${operation}ing within ${entity} data`],
      // @ts-ignore
      autoEnd: false,
      consoleProps() {
        return params
      },
    })

    return cy
      .task(`${operation}:database`, params, { log: logTask })
      .then((data) => {
        log.snapshot()
        log.end()
        return data
      })
  }
)
The first thing we are doing is creating a params object comprised of the entity and query passed into the command.
const params = {
  entity,
  query,
}
Next, we are creating a custom log with Cypress.log().
const log = Cypress.log({
  name: "database",
  displayName: "DATABASE",
  message: [`🔎 ${operation}ing within ${entity} data`],
  // @ts-ignore
  autoEnd: false,
  consoleProps() {
    return params
  },
})
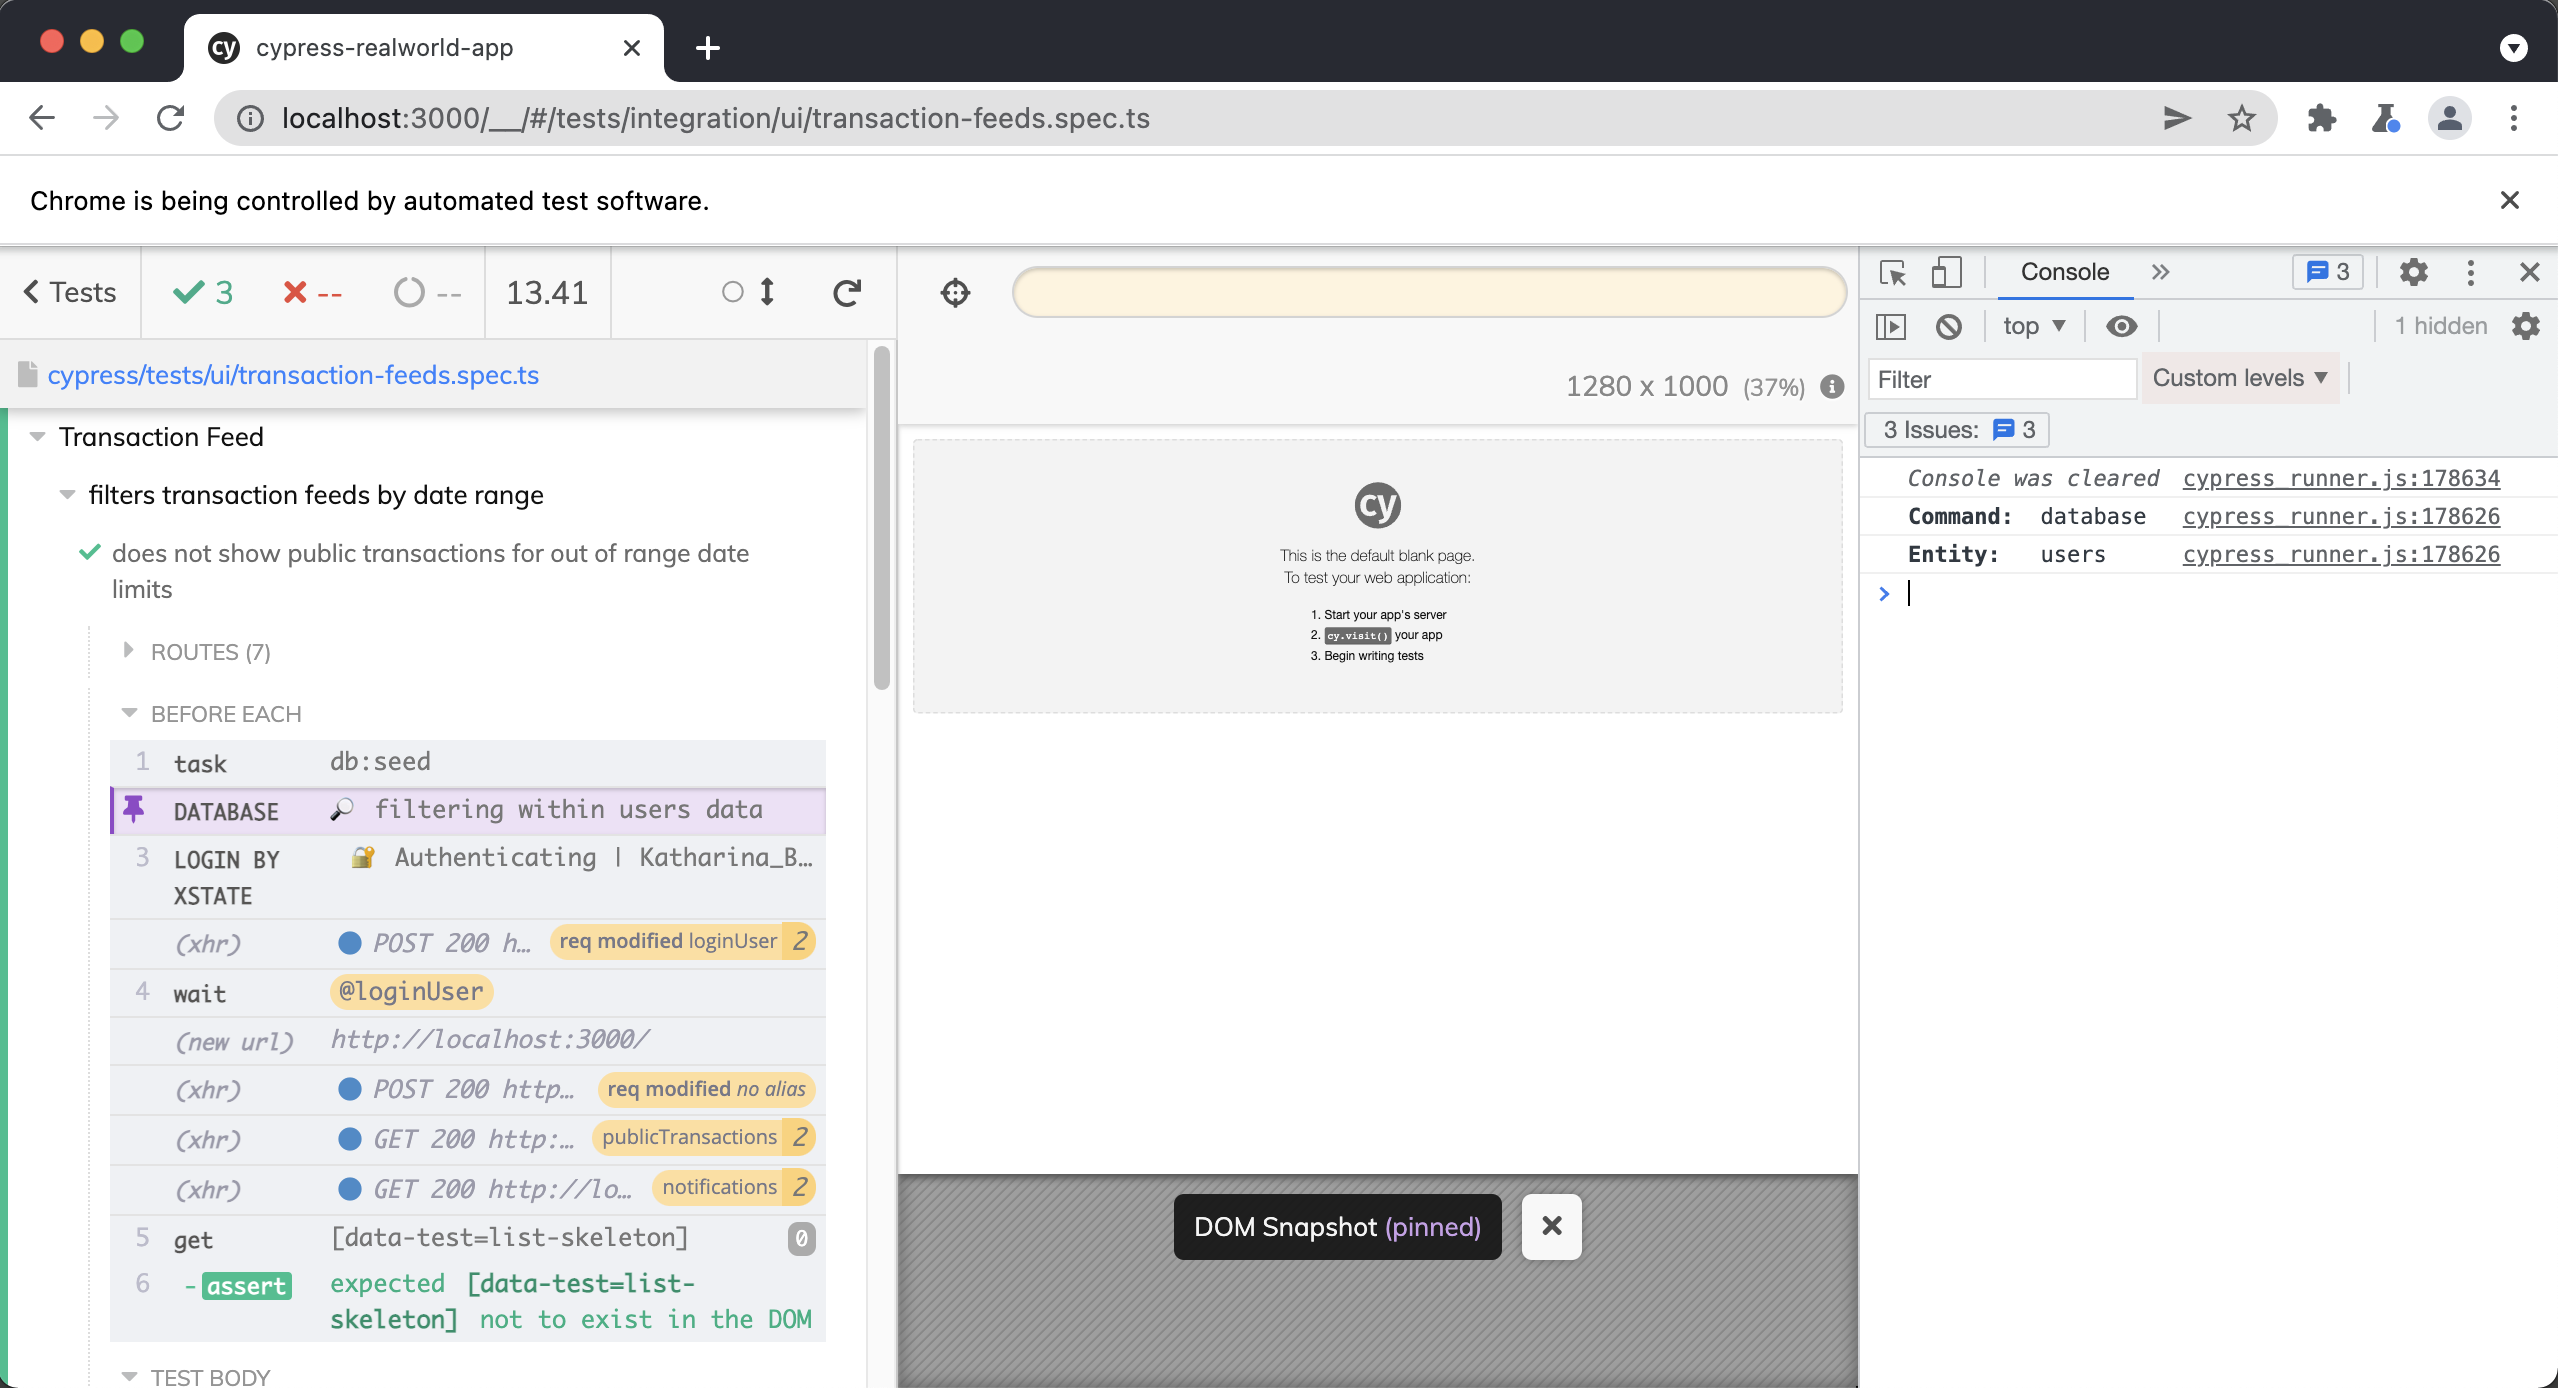
Finally, we are returning a custom task which is responsible for performing whatever operation is passed into this command upon our database, either find or filter.
return cy
  .task(`${operation}:database`, params, { log: logTask })
  .then((data) => {
    log.snapshot()
    log.end()
    return data
  })
This task is registered in setupNodeEvents within the e2e block of cypress.config.ts .
on("task", {
  percyHealthCheck,
  async "db:seed"() {
    // seed database with test data
    const { data } = await axios.post(`${testDataApiEndpoint}/seed`)
    return data
  },

  // fetch test data from a database (MySQL, PostgreSQL, etc...)
  "filter:database"(queryPayload) {
    return queryDatabase(queryPayload, (data, attrs) =>
      _.filter(data.results, attrs)
    )
  },
  "find:database"(queryPayload) {
    return queryDatabase(queryPayload, (data, attrs) =>
      _.find(data.results, attrs)
    )
  },
})
You may be wondering why we have created this as a task instead of a Custom Cypress Command. The reason is that Cypress tasks run in Node, while Cypress Custom Commands run in the browser.
cy.getBySel()
Located in cypress/support/commands.ts .
Cypress.Commands.add("getBySel", (selector, ...args) => {
  return cy.get(`[data-test=${selector}]`, ...args)
})
This simple command takes in a selector and then returns the DOM element by using cy.get().
For example, without this command our code would look like this:
cy.get('[data-test="signup-first-name"]').type("Bob")
cy.get('[data-test="signup-last-name"]').type("Ross")
cy.get('[data-test="signup-username"]').type("PainterJoy90")
cy.get('[data-test="signup-password"]').type("s3cret")
cy.get('[data-test="signup-confirmPassword"]').type("s3cret")
Using this custom command our code now looks like this:
cy.getBySel("signup-first-name").type("Bob")
cy.getBySel("signup-last-name").type("Ross")
cy.getBySel("signup-username").type("PainterJoy90")
cy.getBySel("signup-password").type("s3cret")
cy.getBySel("signup-confirmPassword").type("s3cret")
cy.getBySelLike()
Located in cypress/support/commands.ts .
Cypress.Commands.add("getBySelLike", (selector, ...args) => {
  return cy.get(`[data-test*=${selector}]`, ...args)
})
This simple command takes in a selector wildcard * and returns the DOM element using cy.get(). It functions similarly to our cy.getBySel() custom command only this command will return multiple elements, whereas cy.getBySel() will return only one.
For example, below, we are getting all the transaction items and asserting that there are 3 of them in total.
cy.getBySelLike("transaction-item").should("have.length", 3)
In this example, we are clicking upon the first transaction.
cy.getBySelLike("transaction-item").first().click()
cy.login()
Located in cypress/support/commands.ts .
Cypress.Commands.add(
  "login",
  (username, password, { rememberUser = false } = {}) => {
    const signinPath = "/signin"
    const log = Cypress.log({
      name: "login",
      displayName: "LOGIN",
      message: [`🔐 Authenticating | ${username}`],
      // @ts-ignore
      autoEnd: false,
    })

    cy.intercept("POST", "/login").as("loginUser")
    cy.intercept("GET", "checkAuth").as("getUserProfile")

    cy.location("pathname", { log: false }).then((currentPath) => {
      if (currentPath !== signinPath) {
        cy.visit(signinPath)
      }
    })

    log.snapshot("before")

    cy.getBySel("signin-username").type(username)
    cy.getBySel("signin-password").type(password)

    if (rememberUser) {
      cy.getBySel("signin-remember-me").find("input").check()
    }

    cy.getBySel("signin-submit").click()
    cy.wait("@loginUser").then((loginUser: any) => {
      log.set({
        consoleProps() {
          return {
            username,
            password,
            rememberUser,
            userId:
              loginUser.response.statusCode !== 401 &&
              loginUser.response.body.user.id,
          }
        },
      })

      log.snapshot("after")
      log.end()
    })
  }
)
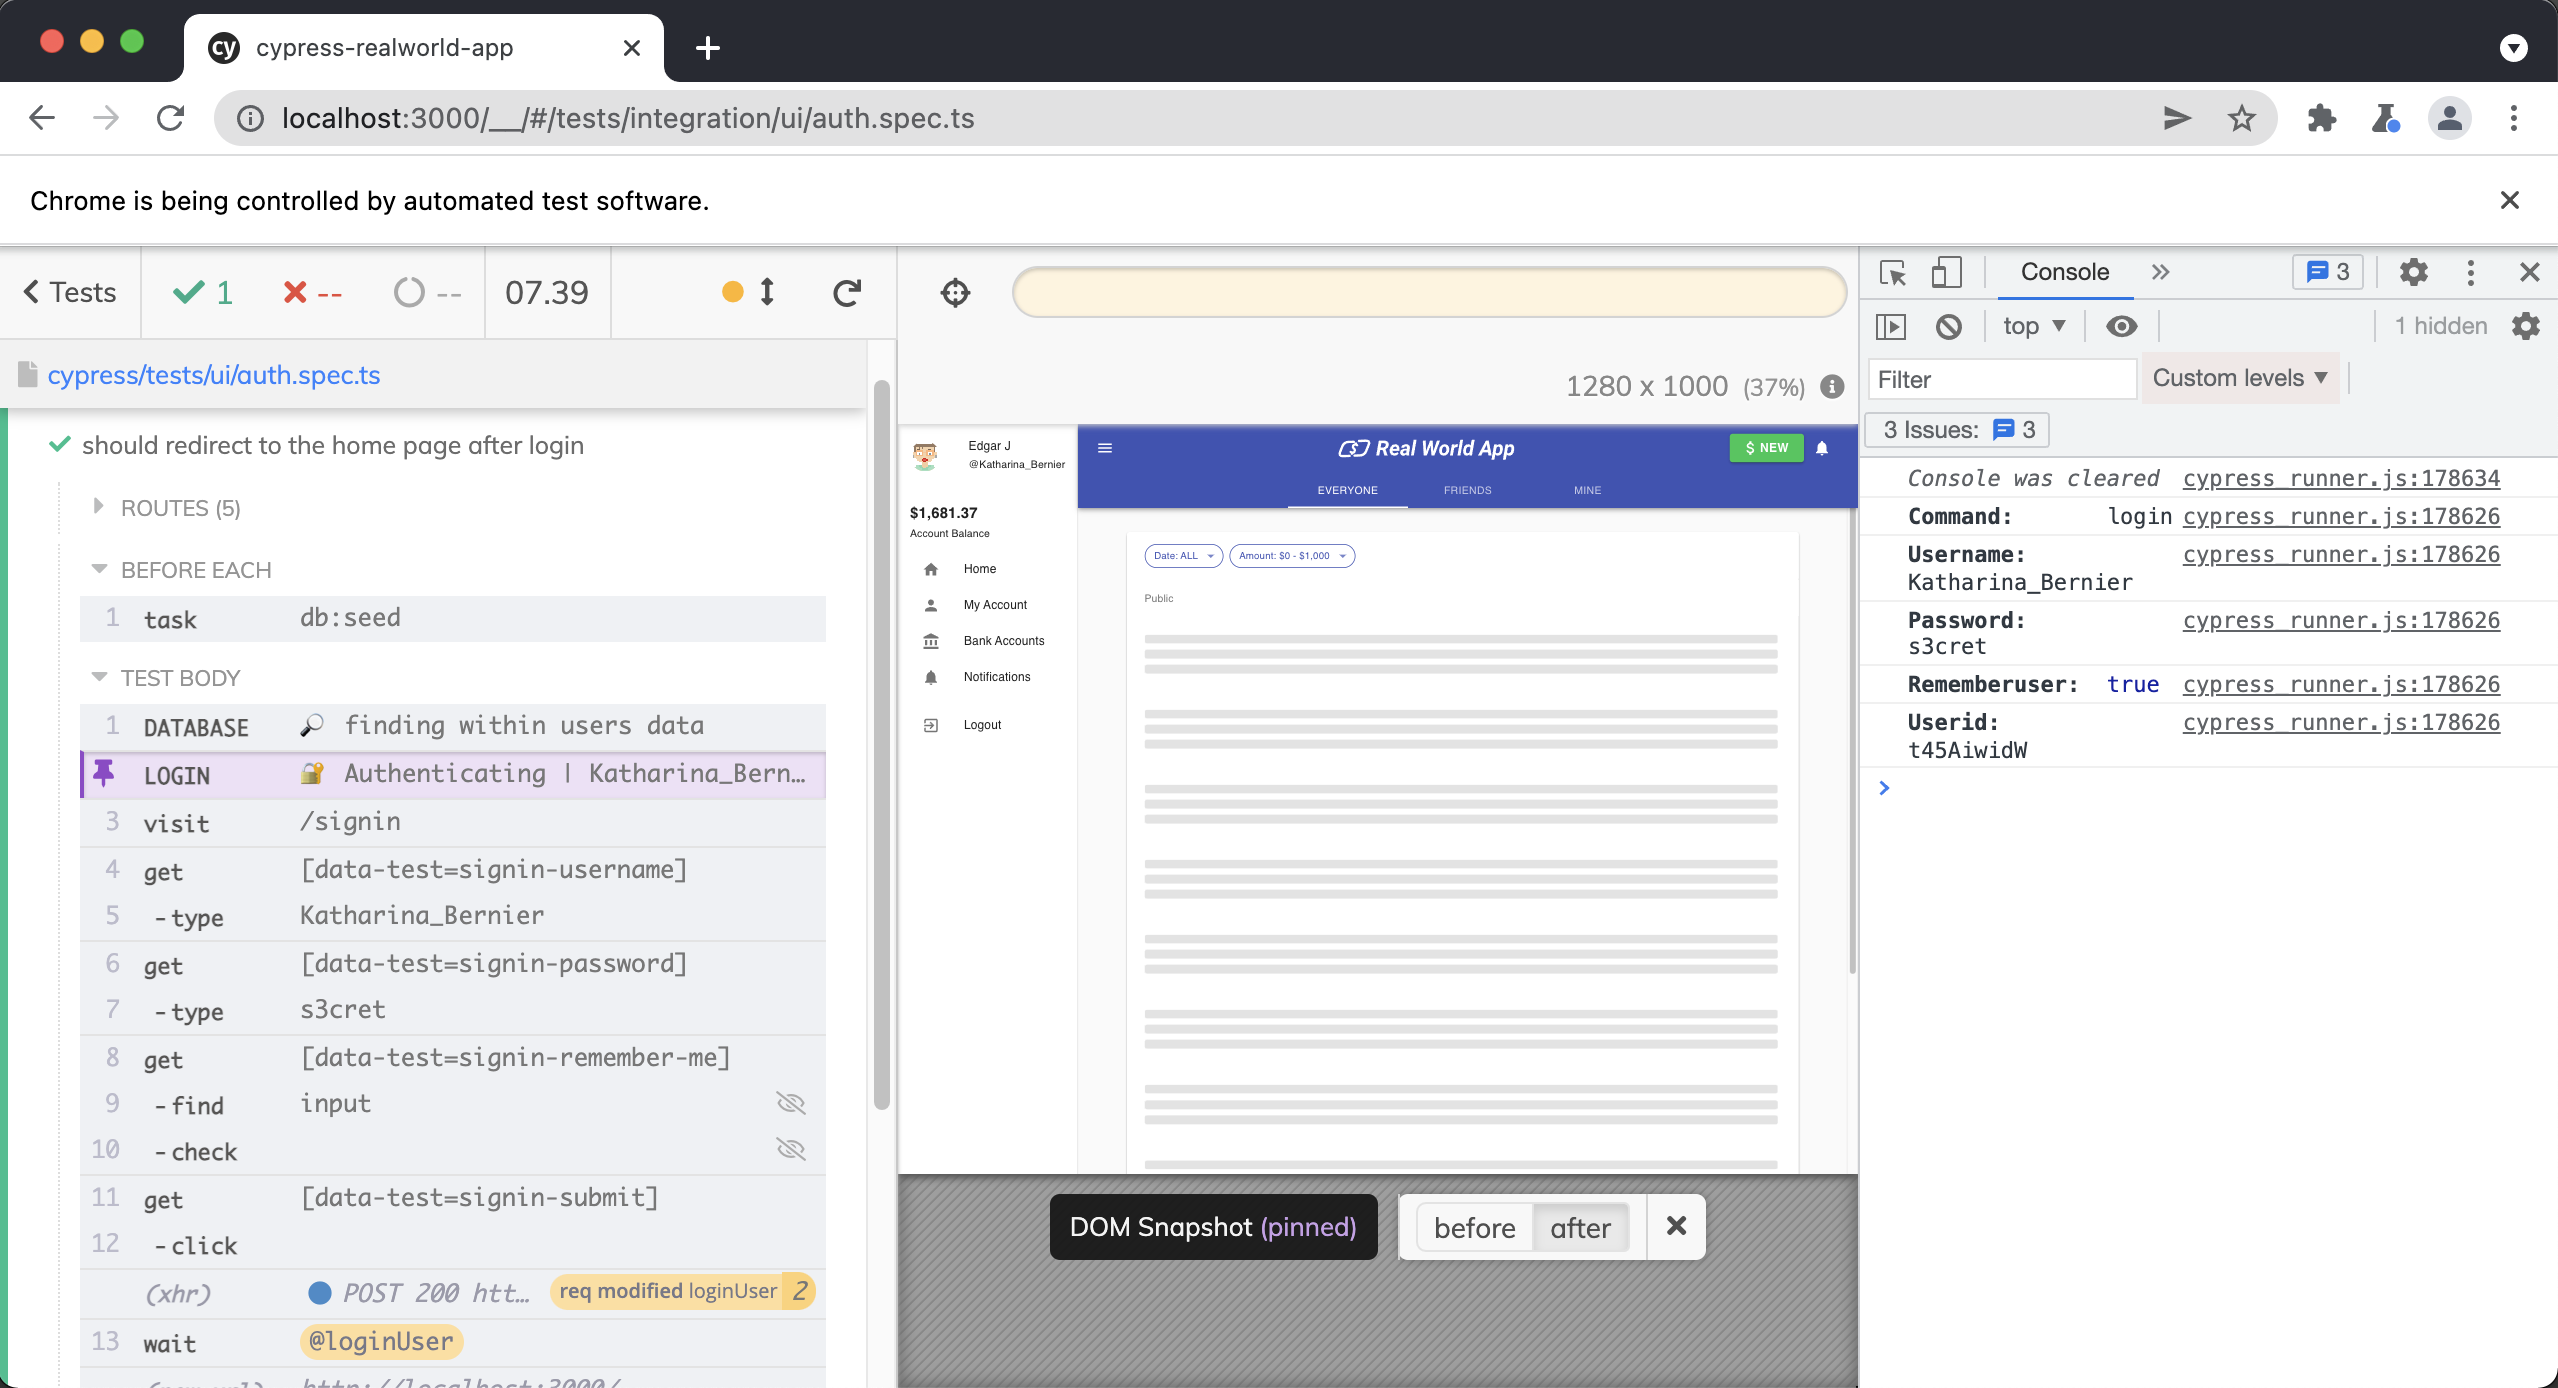
First, we create a constant called signinPath with the path for our sign-in page and use Cypress.log() to log some additional information to the Cypress Command Log.
const signinPath = "/signin"
const log = Cypress.log({
  name: "login",
  displayName: "LOGIN",
  message: [`🔐 Authenticating | ${username}`],
  // @ts-ignore
  autoEnd: false,
})
Next, we are using cy.intercept() to intercept two requests and aliasing them.
cy.intercept("POST", "/login").as("loginUser")
cy.intercept("GET", "checkAuth").as("getUserProfile")
We then check the currentPath, which is the URL in the browser's address bar. If it is not "/signin," then we use `cy.visit() to navigate to "/signin."
cy.location("pathname", { log: false }).then((currentPath) => {
  if (currentPath !== signinPath) {
    cy.visit(signinPath)
  }
})
We then take a DOM snapshot using Cypress.log(), which we declared above.
log.snapshot("before")
We then grab the username and password input fields and type in the username and password, respectively.
cy.getBySel("signin-username").type(username)
cy.getBySel("signin-password").type(password)
Then we have a conditional to check if we want to "remember the user." By default, we set this to be false in the command signature.
if (rememberUser) {
  cy.getBySel("signin-remember-me").find("input").check()
}
Finally, we click on the sign-in button and wait on the @loginUser intercept alias. We then use log.set() to set some of the login information in our Cypress.log(). We then take a final DOM snapshot and .end() our log.
cy.getBySel("signin-submit").click()
cy.wait("@loginUser").then((loginUser: any) => {
  log.set({
    consoleProps() {
      return {
        username,
        password,
        rememberUser,
        userId:
          loginUser.response.statusCode !== 401 &&
          loginUser.response.body.user.id,
      }
    },
  })

  log.snapshot("after")
  log.end()
})
cy.loginByAPI()
Located in cypress/support/commands.ts .
Cypress.Commands.add("loginByApi", (username, password) => {
  const sendLogin = (pw) =>
    cy.request("POST", `${Cypress.expose("apiUrl")}/login`, {
      username,
      password: pw,
    })

  return password !== undefined
    ? sendLogin(password)
    : cy
        .env(["defaultPassword"])
        .then(({ defaultPassword }) => sendLogin(defaultPassword))
})
This command logs in a user via one of our API endpoints. It takes the username and password and sends a POST request to our "/login" endpoint, and logs in our user.
Note how we handle our two kinds of configuration values differently (Cypress 15.10.0+):
apiUrlis non-sensitive, public configuration, so it lives under theexposekey incypress.config.tsand is read synchronously with Cypress.expose().defaultPasswordis a secret, so it lives under theenvkey and is read with cy.env(), which resolves only the values you ask for and keeps them out of the browser. Becausecy.env()is asynchronous, we fall back to it inside a.then()only when apasswordargument was not provided.
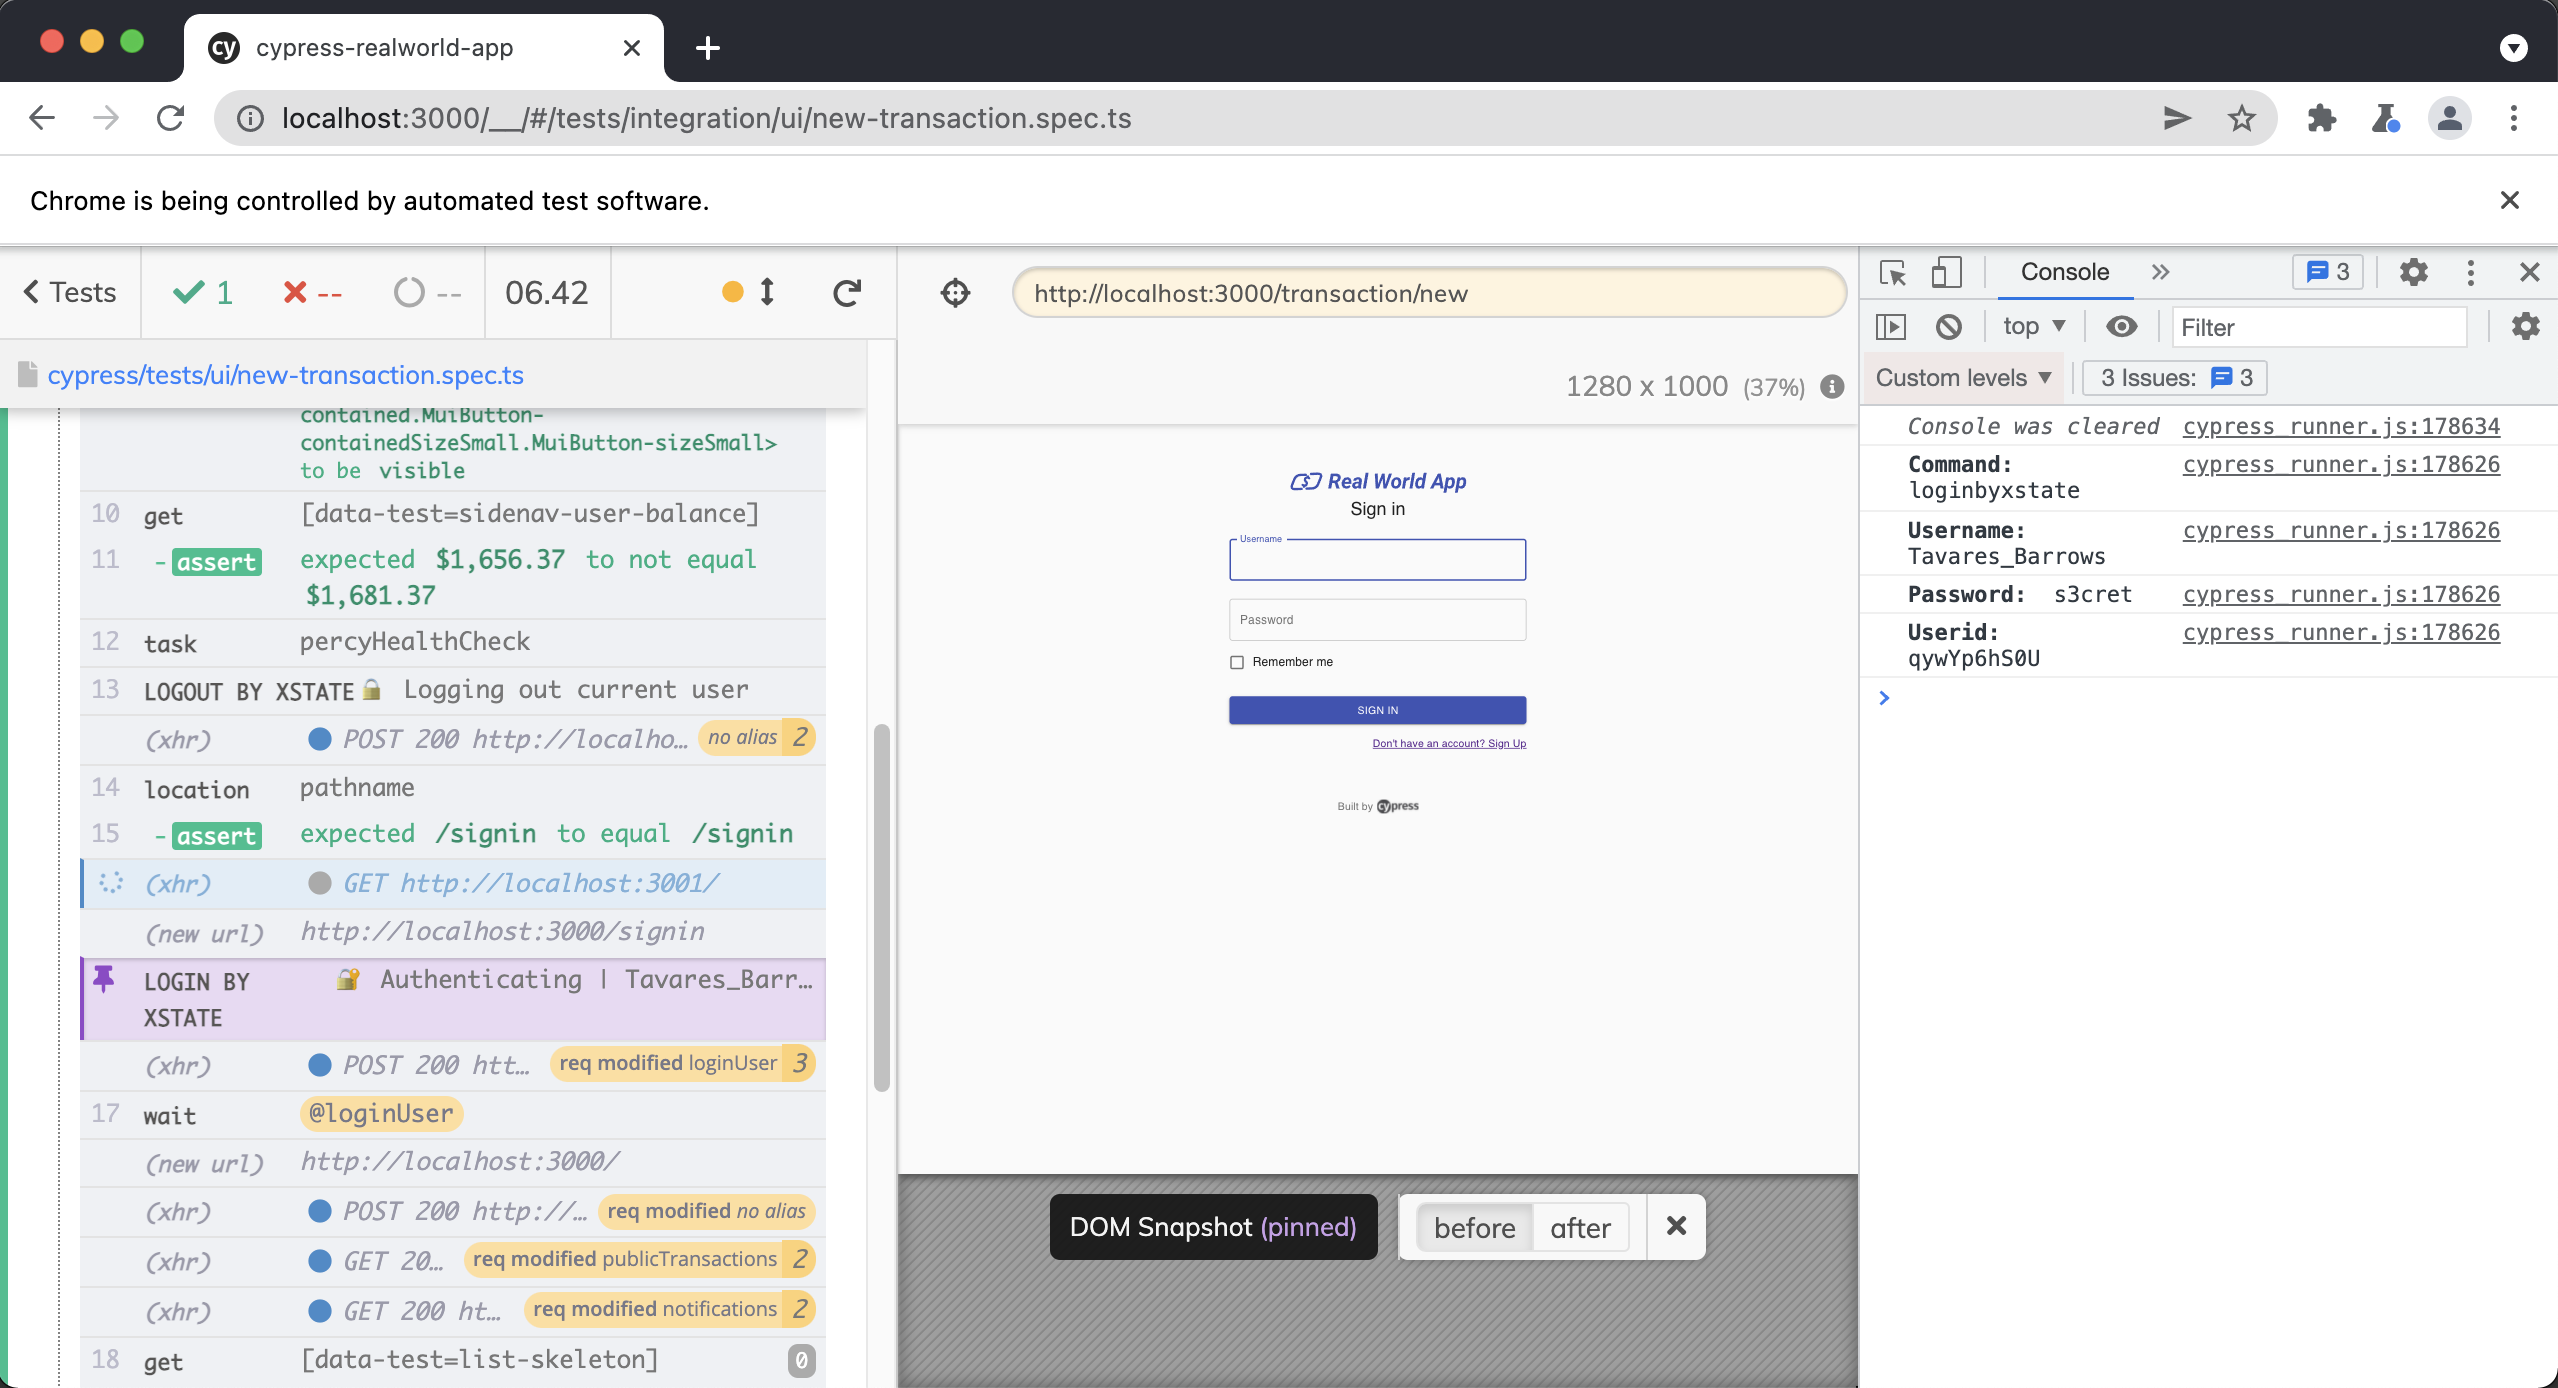
cy.loginByXstate()
Located in cypress/support/commands.ts .
Cypress.Commands.add("loginByXstate", (username, password) => {
  const log = Cypress.log({
    name: "loginbyxstate",
    displayName: "LOGIN BY XSTATE",
    message: [`🔐 Authenticating | ${username}`],
    autoEnd: false,
  })

  cy.intercept("POST", "/login").as("loginUser")
  cy.intercept("GET", "/checkAuth").as("getUserProfile")
  cy.visit("/signin", { log: false }).then(() => {
    log.snapshot("before")
  })

  const doLogin = (pw) => {
    cy.window({ log: false }).then((win) =>
      win.authService.send("LOGIN", { username, password: pw })
    )

    cy.wait("@loginUser").then((loginUser) => {
      log.set({
        consoleProps() {
          return {
            username,
            password: pw,
            // @ts-ignore
            userId: loginUser.response.body.user.id,
          }
        },
      })
    })
  }

  if (password !== undefined) {
    doLogin(password)
  } else {
    cy.env(["defaultPassword"]).then(({ defaultPassword }) =>
      doLogin(defaultPassword)
    )
  }

  return cy
    .getBySel("list-skeleton")
    .should("not.exist")
    .then(() => {
      log.snapshot("after")
      log.end()
    })
})
A lot is going on in this custom command, but we will break it down step by step.
First, the command accepts a username and an optional password. When no password is passed, we fall back to a seeded default. Because defaultPassword is a secret, it lives under the env key in cypress.config.ts and is read with cy.env() (Cypress 15.10.0+), which keeps it out of the browser and resolves only the values you request. Since cy.env() is asynchronous, we resolve the password inside a .then() and then continue logging in via the doLogin helper.
This environment variable can be found in cypress.config.ts under the env key.
env: {
  defaultPassword: process.env.SEED_DEFAULT_USER_PASSWORD,
},
On the right hand side we are reading our environment variable from the .env file in the root of the project around line 10
SEED_DEFAULT_USER_PASSWORD = s3cret
Next, we are creating some custom logging with Cypress.log().
const log = Cypress.log({
  name: "loginbyxstate",
  displayName: "LOGIN BY XSTATE",
  message: [`🔐 Authenticating | ${username}`],
  autoEnd: false,
})
Then, we use cy.intercept() to intercept two requests and alias them.
cy.intercept("POST", "/login").as("loginUser")
cy.intercept("GET", "/checkAuth").as("getUserProfile")
Then, we visit the /signin route and take a DOM snapshot of the page.
cy.visit("/signin", { log: false }).then(() => {
  log.snapshot("before")
})
Next, we log in our user by sending an event to the XState store, responsible for handling all of our client-side state around authentication. It is very similar to Redux. The authservice is attached to the window object, so we use cy.window() to grab the window object from the browser. We intentionally expose this service to the window object so that Cypress has access to it. You can see an example of how we are doing this here.
Then we trigger the LOGIN action with our username and the resolved password (pw), which updates XState, and logs in the user. This runs inside the doLogin helper so it works whether the password was passed in directly or resolved from cy.env(["defaultPassword"]).
cy.window({ log: false }).then((win) =>
  win.authService.send("LOGIN", { username, password: pw })
)
We are then using cy.wait() on the @loginUser intercept alias and set some of the login data in our Cypress.log() declared above.
cy.wait("@loginUser").then((loginUser) => {
    log.set({
      consoleProps() {
        return {
          username,
          password: pw,
          // @ts-ignore
          userId: loginUser.response.body.user.id,
        };
      },
    });
Once complete, we set our custom log to log the user's information. This information will be logged to the browser's console when we click on this step in the Cypress UI.
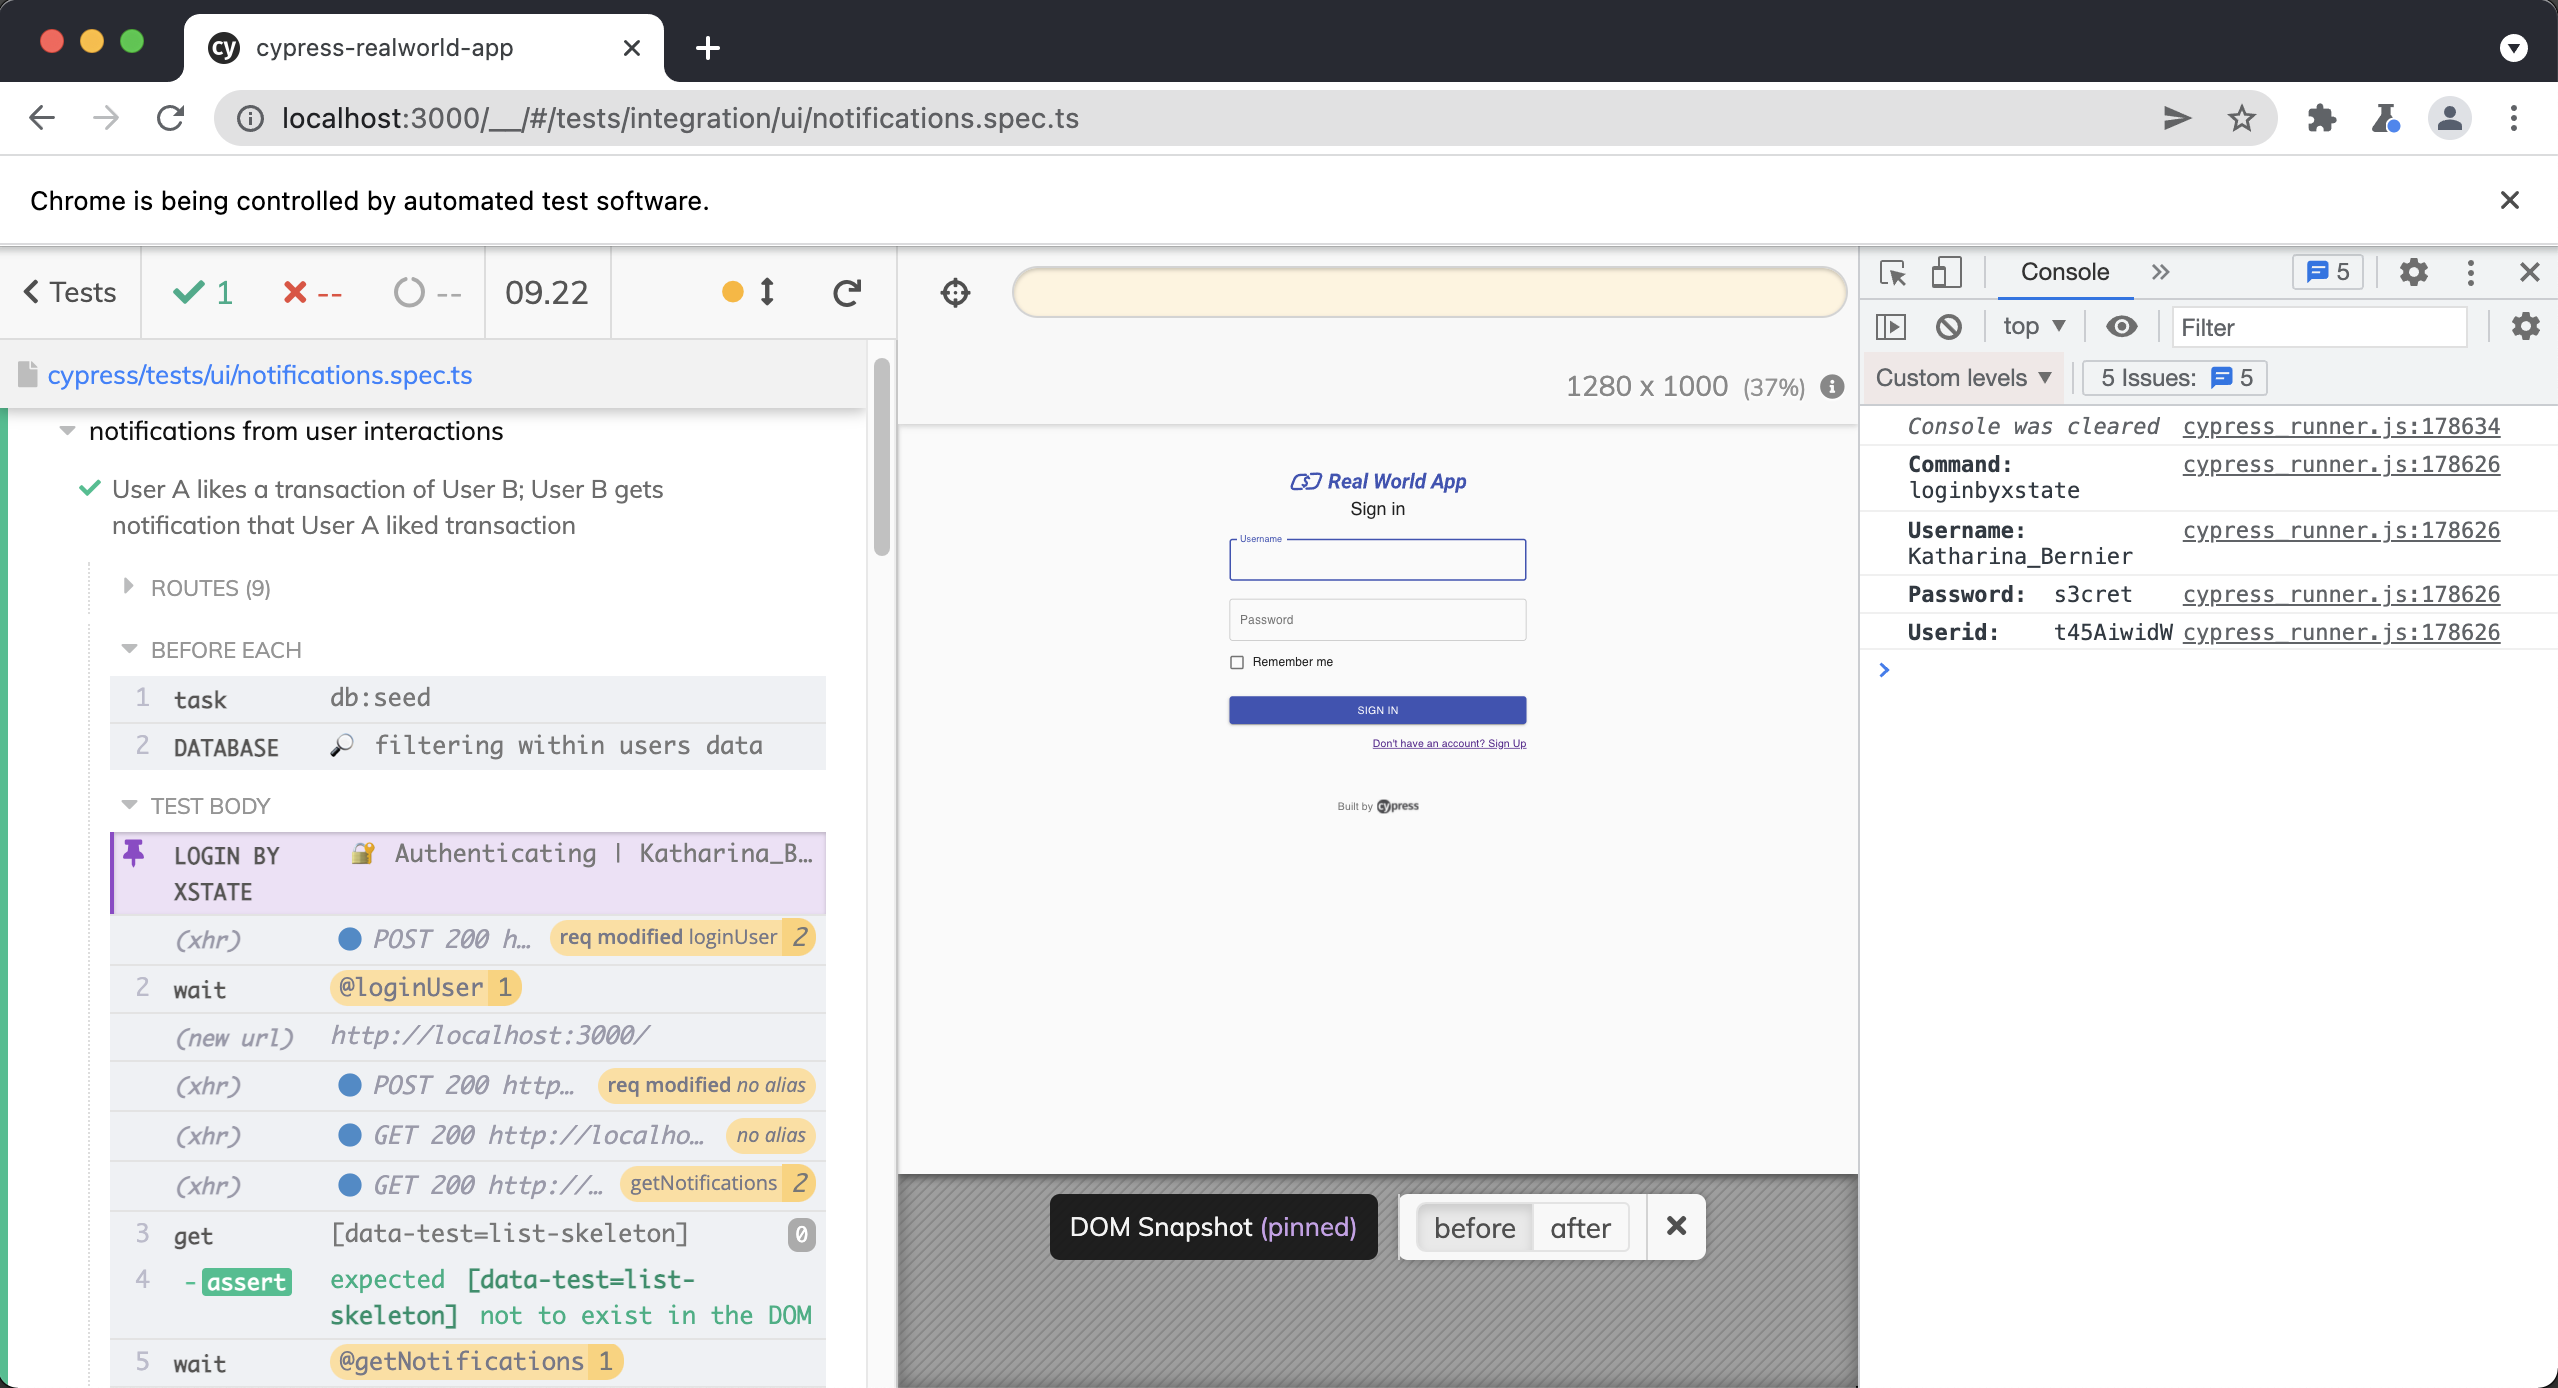
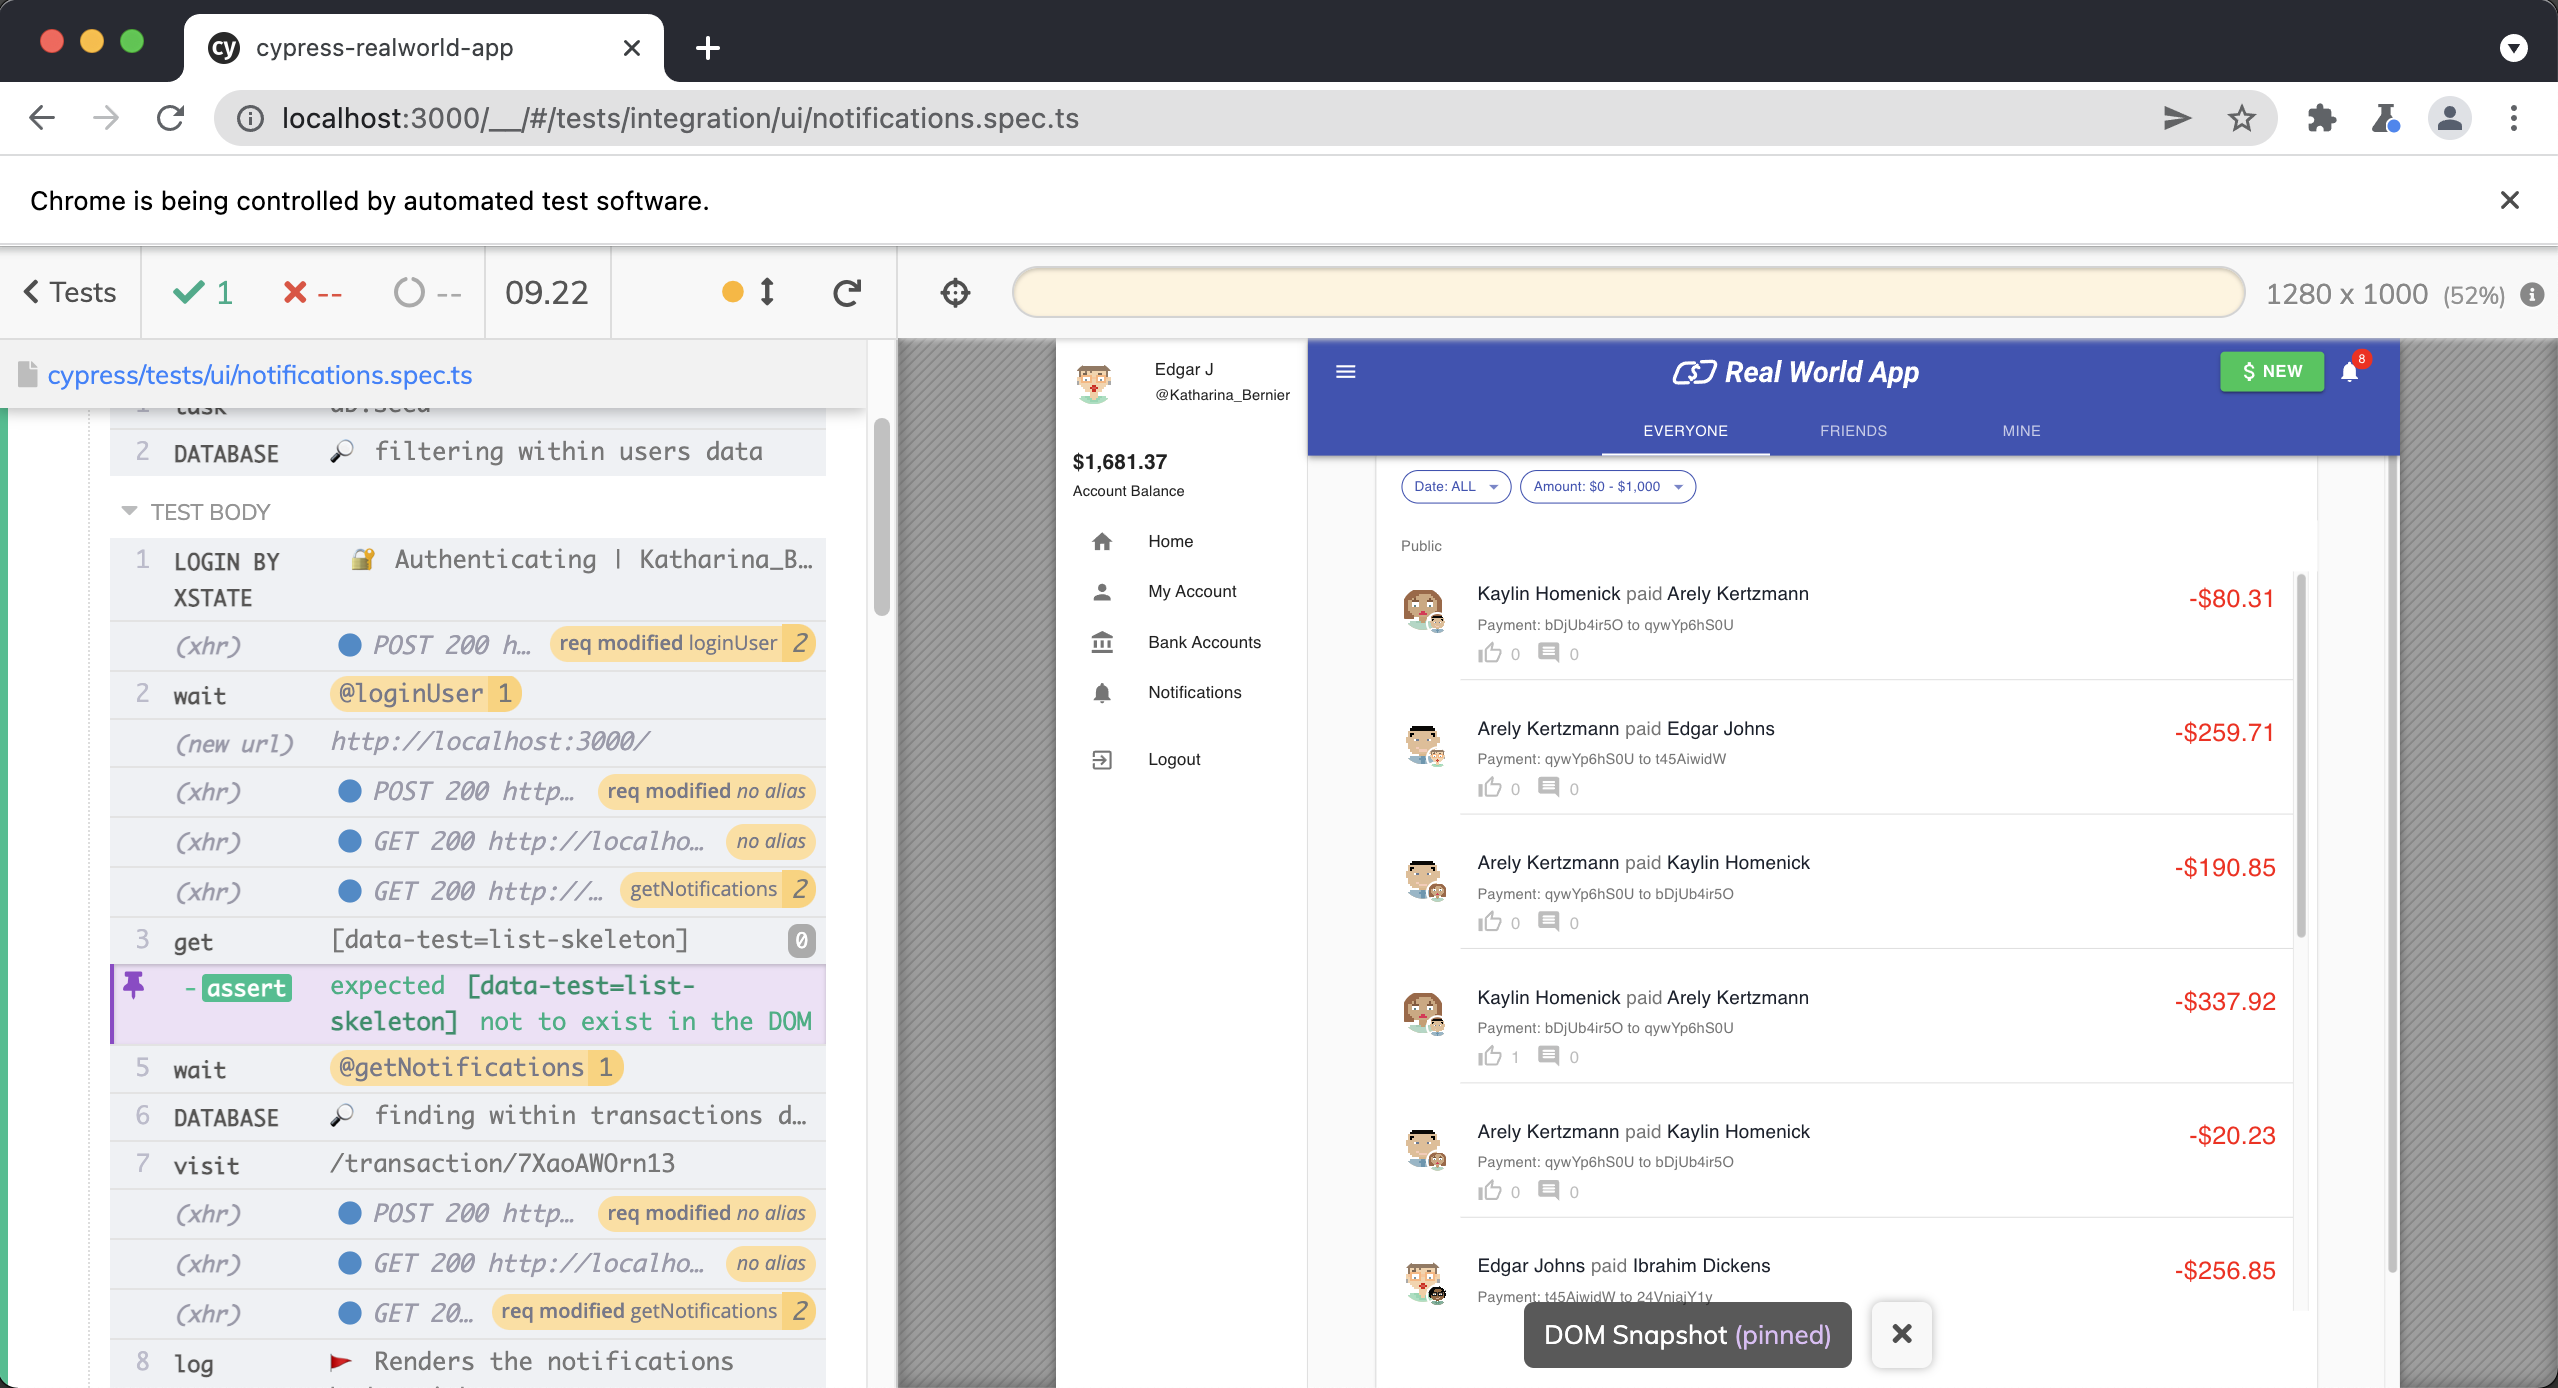
Finally, we write an assertion to confirm that the "loading skeleton" is no longer in the DOM and take a final DOM snapshot.
return cy
  .getBySel("list-skeleton")
  .should("not.exist")
  .then(() => {
    log.snapshot("after")
    log.end()
  })
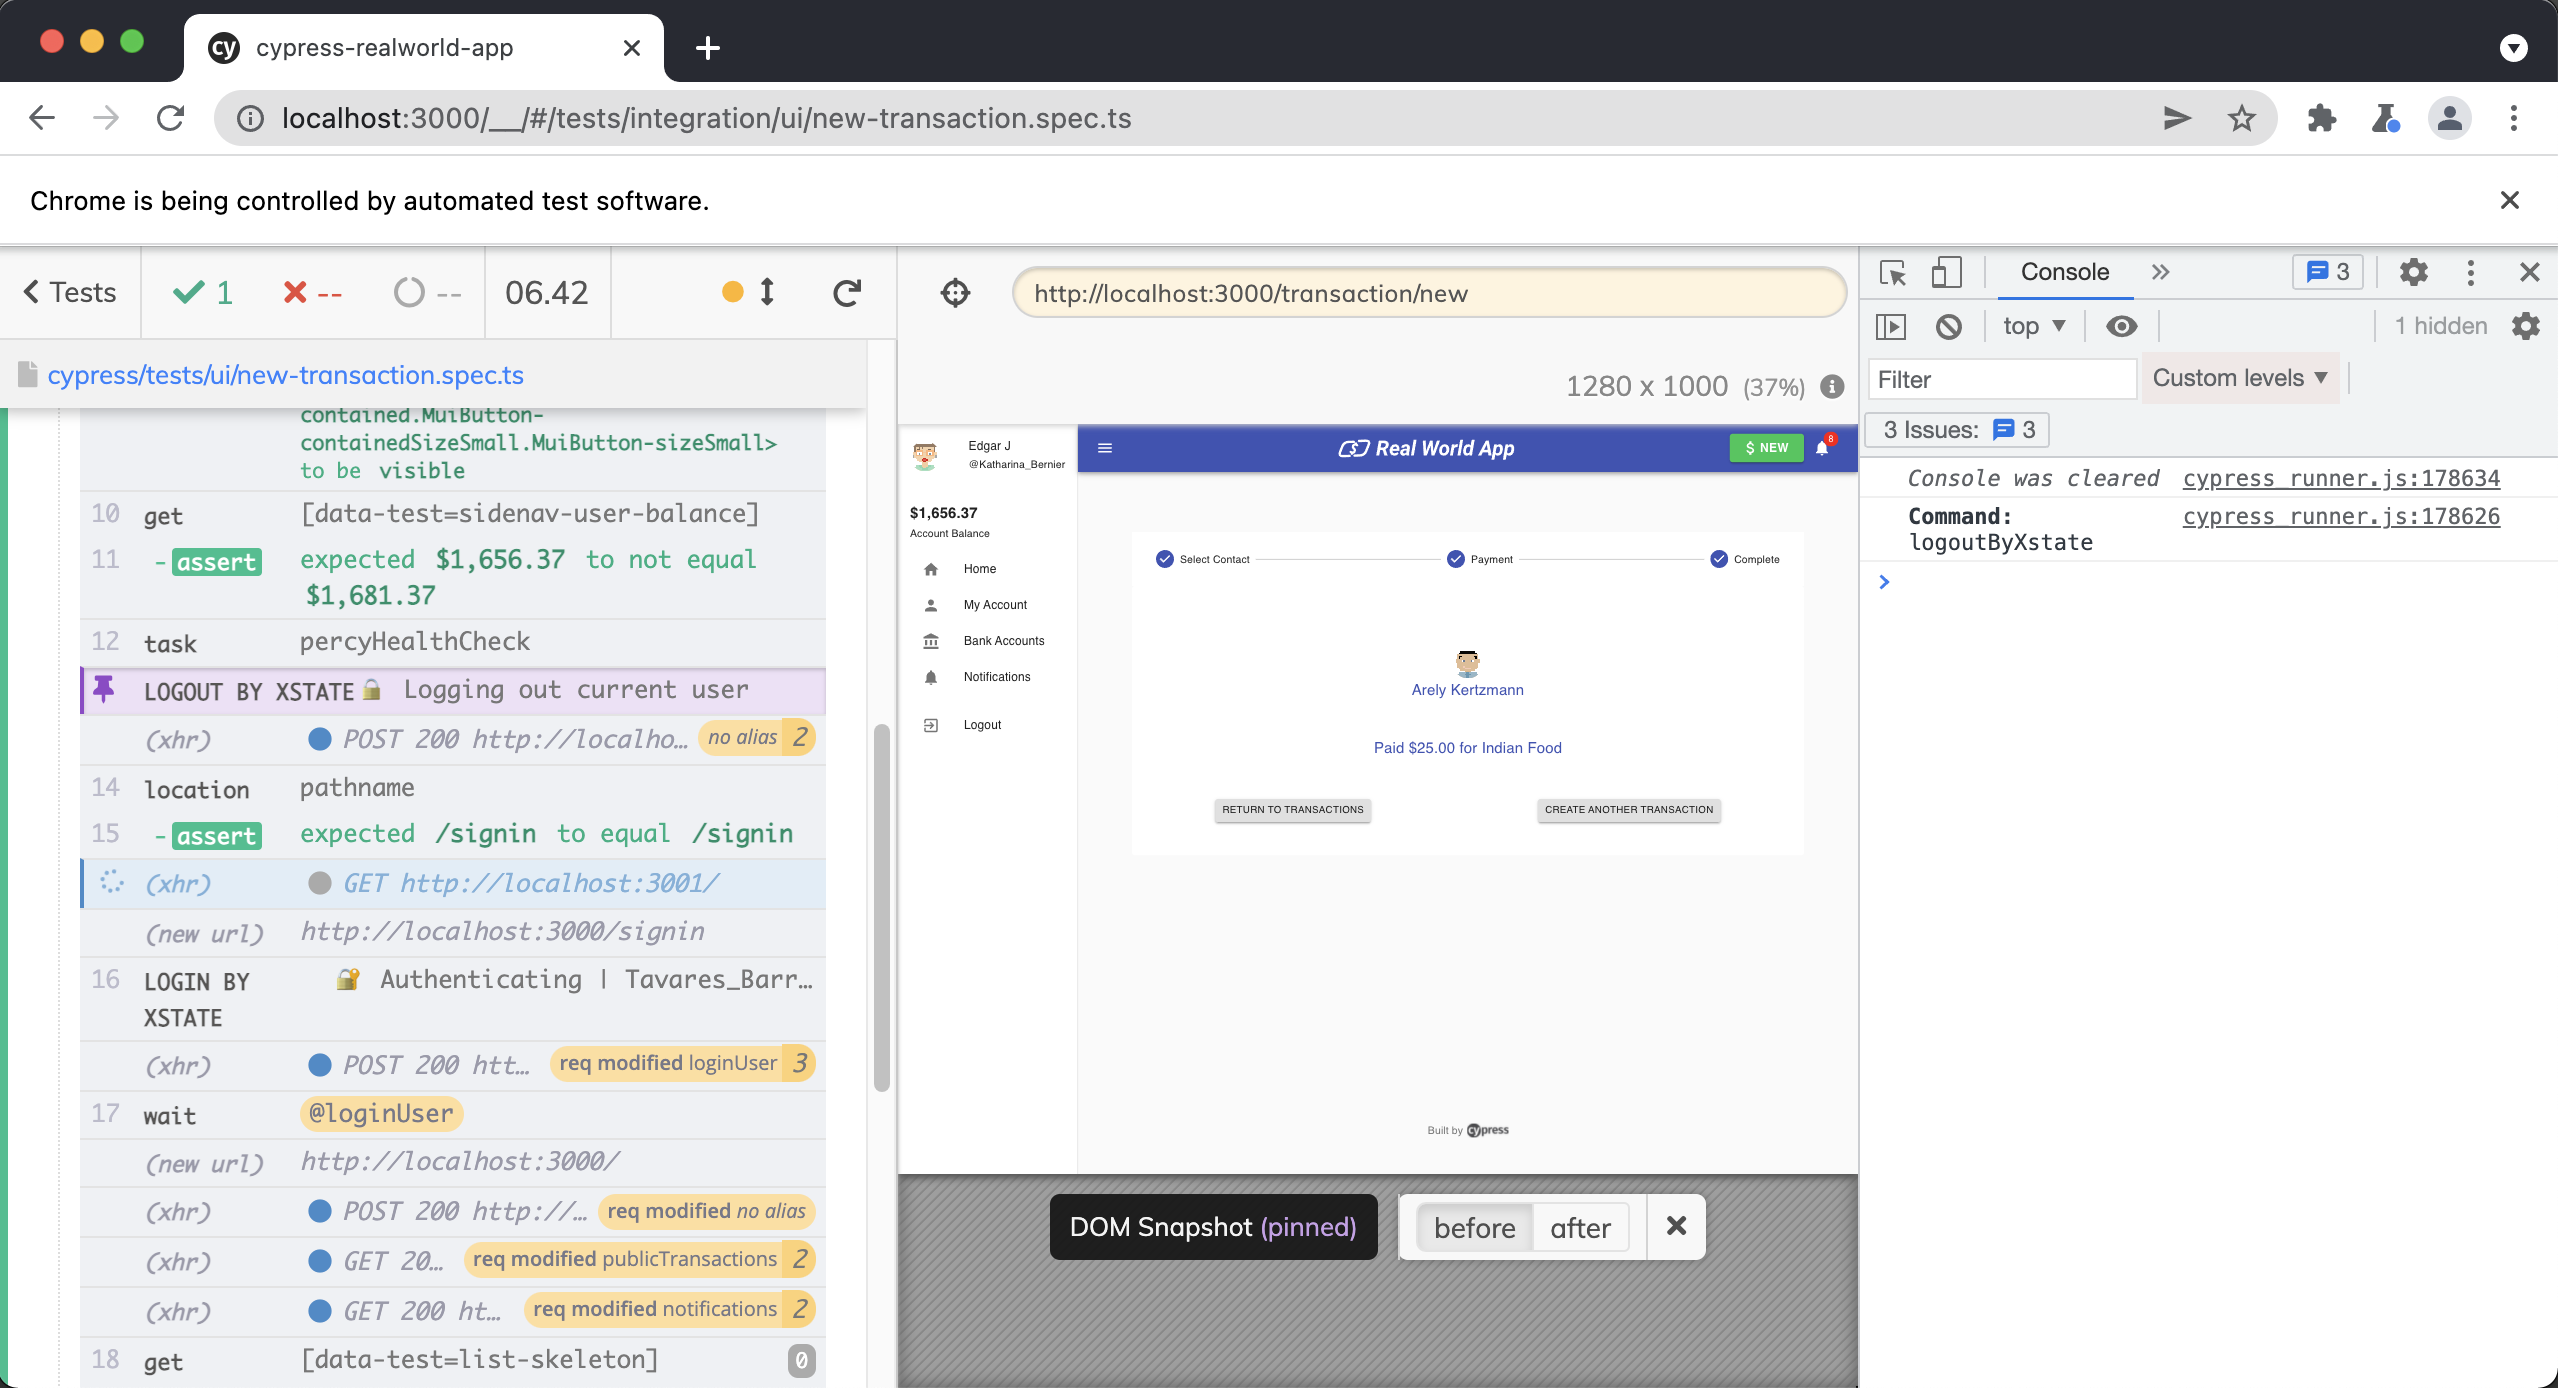
cy.logoutByXstate()
Located in cypress/support/commands.ts .
Cypress.Commands.add("logoutByXstate", () => {
  const log = Cypress.log({
    name: "logoutByXstate",
    displayName: "LOGOUT BY XSTATE",
    message: [`🔒 Logging out current user`],
    // @ts-ignore
    autoEnd: false,
  })

  cy.window({ log: false }).then((win) => {
    log.snapshot("before")
    win.authService.send("LOGOUT")
  })

  return cy
    .location("pathname")
    .should("equal", "/signin")
    .then(() => {
      log.snapshot("after")
      log.end()
    })
})
First, we are using Cypress.log() to log some custom information to the Cypress Command Log.
const log = Cypress.log({
  name: "logoutByXstate",
  displayName: "LOGOUT BY XSTATE",
  message: [`🔒 Logging out current user`],
  // @ts-ignore
  autoEnd: false,
})
Next, we log out our user by updating the XState store, which handles all of our client-side state around authentication. It is very similar to Redux. The authservice is attached to the window object, so we use cy.window() to grab the window object from the browser. We intentionally expose this service to the window object so that Cypress has access to it. You can see an example of how we are doing this here.
Then we trigger the LOGOUT action, which updates XState, and logs out the user.
cy.window({ log: false }).then((win) => {
  log.snapshot("before")
  win.authService.send("LOGOUT")
})
Finally, we write an assertion that the application redirects us to the "/signin" page after being logged out. We then take a final DOM snapshot.
return cy
  .location("pathname")
  .should("equal", "/signin")
  .then(() => {
    log.snapshot("after")
    log.end()
  })
cy.nextTransactionFeedPage()
Located in cypress/support/commands.ts .
Cypress.Commands.add("nextTransactionFeedPage", (service, page) => {
  const log = Cypress.log({
    name: "nextTransactionFeedPage",
    displayName: "NEXT TRANSACTION FEED PAGE",
    message: [`📃 Fetching page ${page} with ${service}`],
    // @ts-ignore
    autoEnd: false,
    consoleProps() {
      return {
        service,
        page,
      }
    },
  })

  return cy
    .window({ log: false })
    .then((win) => {
      log.snapshot("before")
      // @ts-ignore
      return win[service].send("FETCH", { page })
    })
    .then(() => {
      log.snapshot("after")
      log.end()
    })
})
First, we are outputting some custom information to the Cypress Command Log.
const log = Cypress.log({
  name: "nextTransactionFeedPage",
  displayName: "NEXT TRANSACTION FEED PAGE",
  message: [`📃 Fetching page ${page} with ${service}`],
  // @ts-ignore
  autoEnd: false,
  consoleProps() {
    return {
      service,
      page,
    }
  },
})
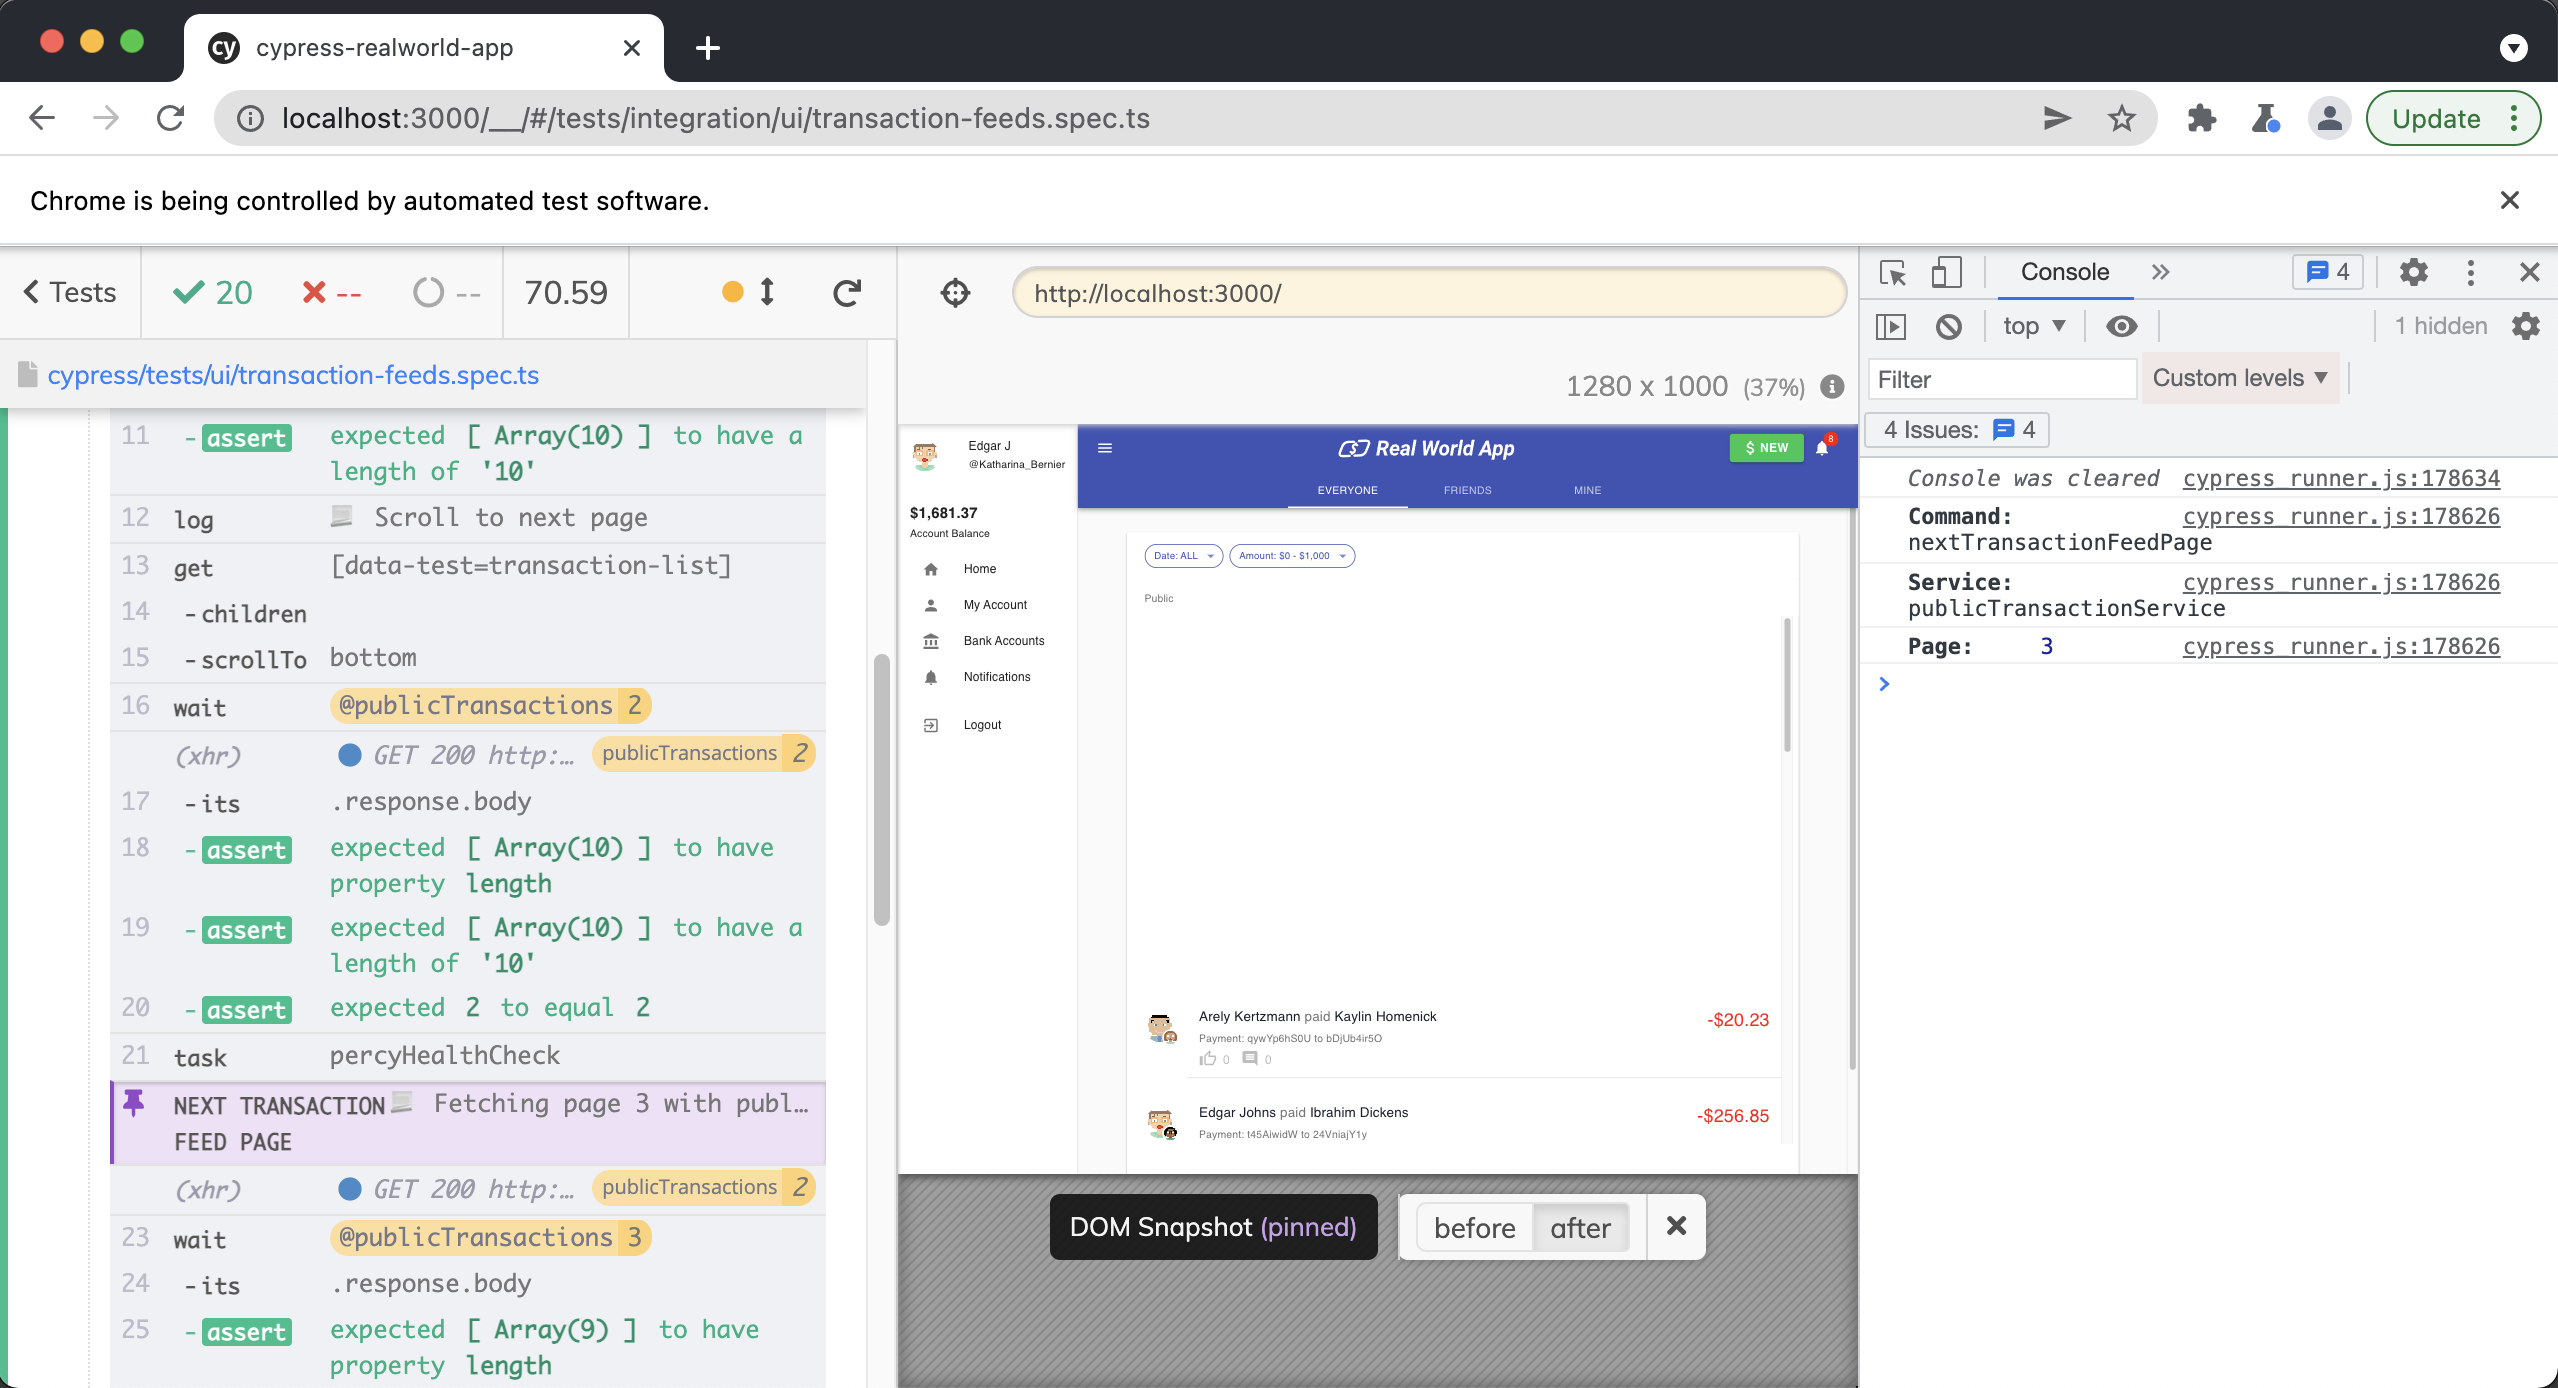
Next, we are using cy.window() to grab the window object and take a DOM snapshot with log.snapshot("before"). We then send the FETCH action to whichever service is passed in along with the page number. We use pagination in the application, so the page number represents which paginated page of transactions we would like to return.
We intentionally expose these services from our machines in Xstate to the window object so that Cypress has access to them.
Then, we take one final DOM snapshot and end the log.
return cy
  .window({ log: false })
  .then((win) => {
    log.snapshot("before")
    // @ts-ignore
    return win[service].send("FETCH", { page })
  })
  .then(() => {
    log.snapshot("after")
    log.end()
  })
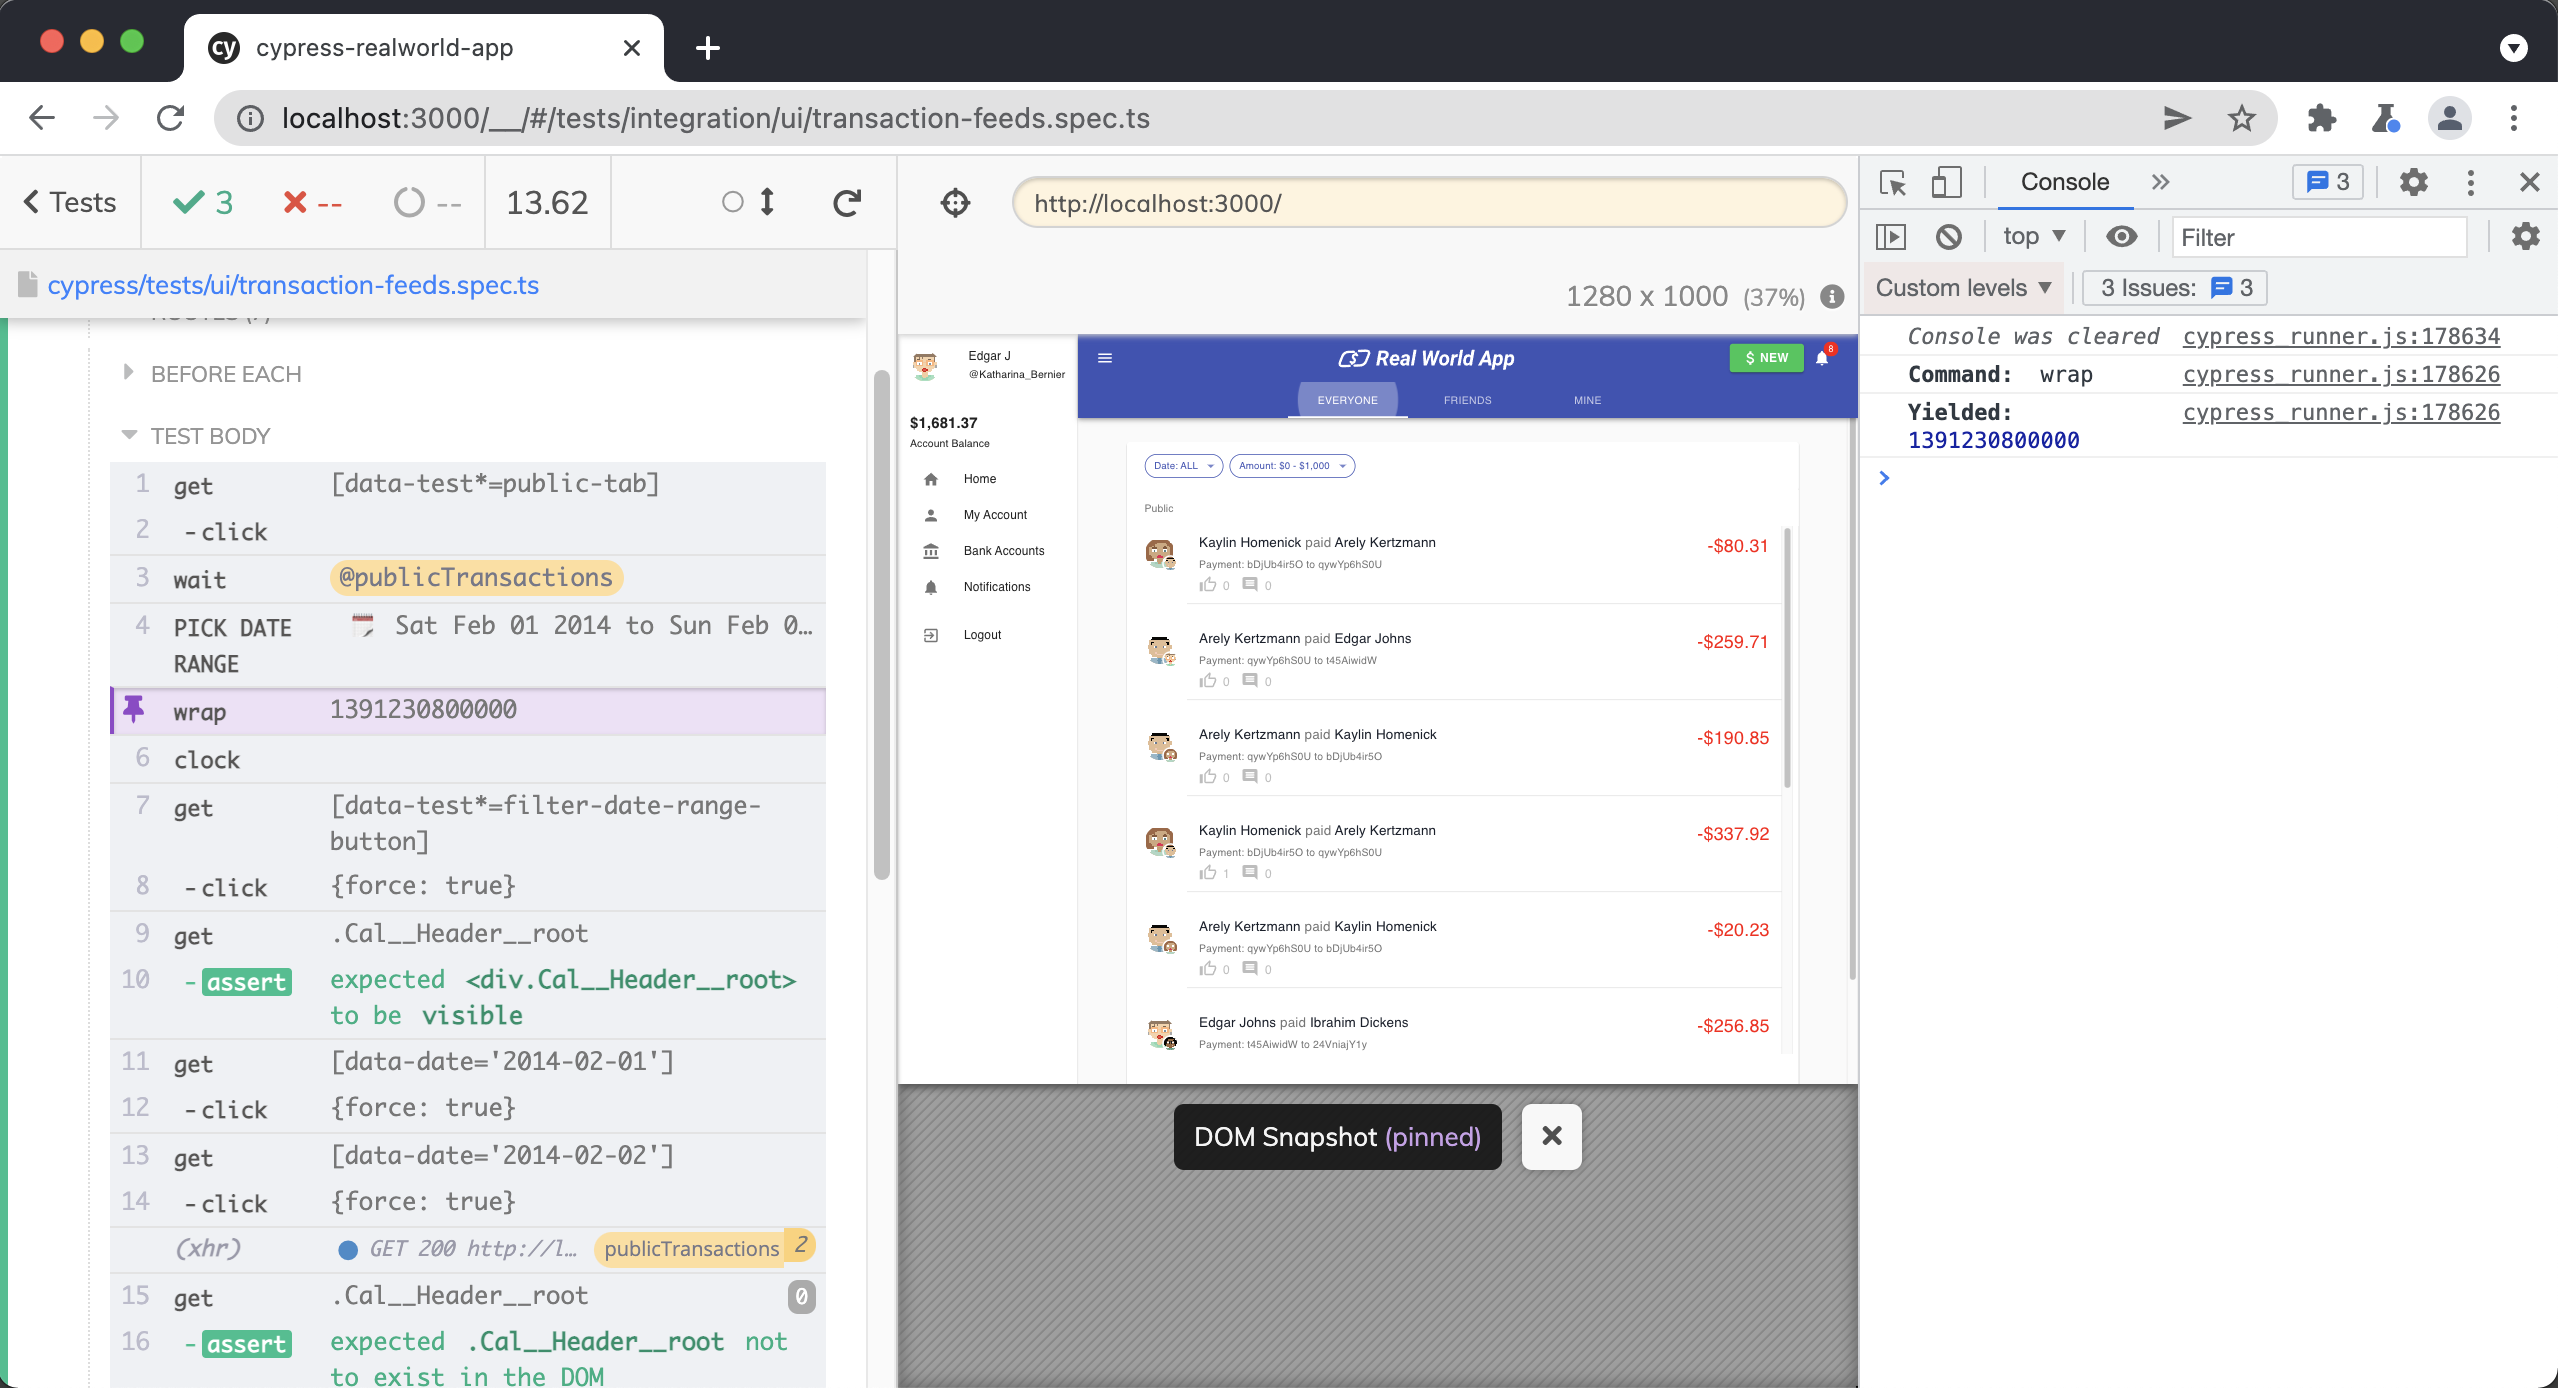
cy.pickDateRange()
This command is responsible for selecting dates from a 3rd party date picker. We decided to wrap this functionality into a command. It wraps some complex interactions with a 3rd party component, is used in multiple tests, and provides proper logging for what the command is doing in the Cypress Command Log.
Located in cypress/support/commands.ts .
Cypress.Commands.add("pickDateRange", (startDate, endDate) => {
  const log = Cypress.log({
    name: "pickDateRange",
    displayName: "PICK DATE RANGE",
    message: [`🗓 ${startDate.toDateString()} to ${endDate.toDateString()}`],
    // @ts-ignore
    autoEnd: false,
    consoleProps() {
      return {
        startDate,
        endDate,
      }
    },
  })

  const selectDate = (date: number) => {
    return cy
      .get(`[data-date='${formatDate(date, "yyyy-MM-dd")}']`)
      .click({ force: true })
  }

  log.snapshot("before")
  // Focus initial viewable date picker range around target start date
  // @ts-ignore
  cy.clock(startDate.getTime(), ["Date"])

  // Open date range picker
  cy.getBySelLike("filter-date-range-button").click({ force: true })
  cy.get(".Cal__Header__root").should("be.visible")

  // Select date range
  selectDate(startDate)
  selectDate(endDate).then(() => {
    log.snapshot("after")
    log.end()
  })

  cy.get(".Cal__Header__root").should("not.exist")
})
First, we are using Cypress.log() to output some custom information to the Cypress Command Log.
const log = Cypress.log({
  name: "pickDateRange",
  displayName: "PICK DATE RANGE",
  message: [`🗓 ${startDate.toDateString()} to ${endDate.toDateString()}`],
  // @ts-ignore
  autoEnd: false,
  consoleProps() {
    return {
      startDate,
      endDate,
    }
  },
})
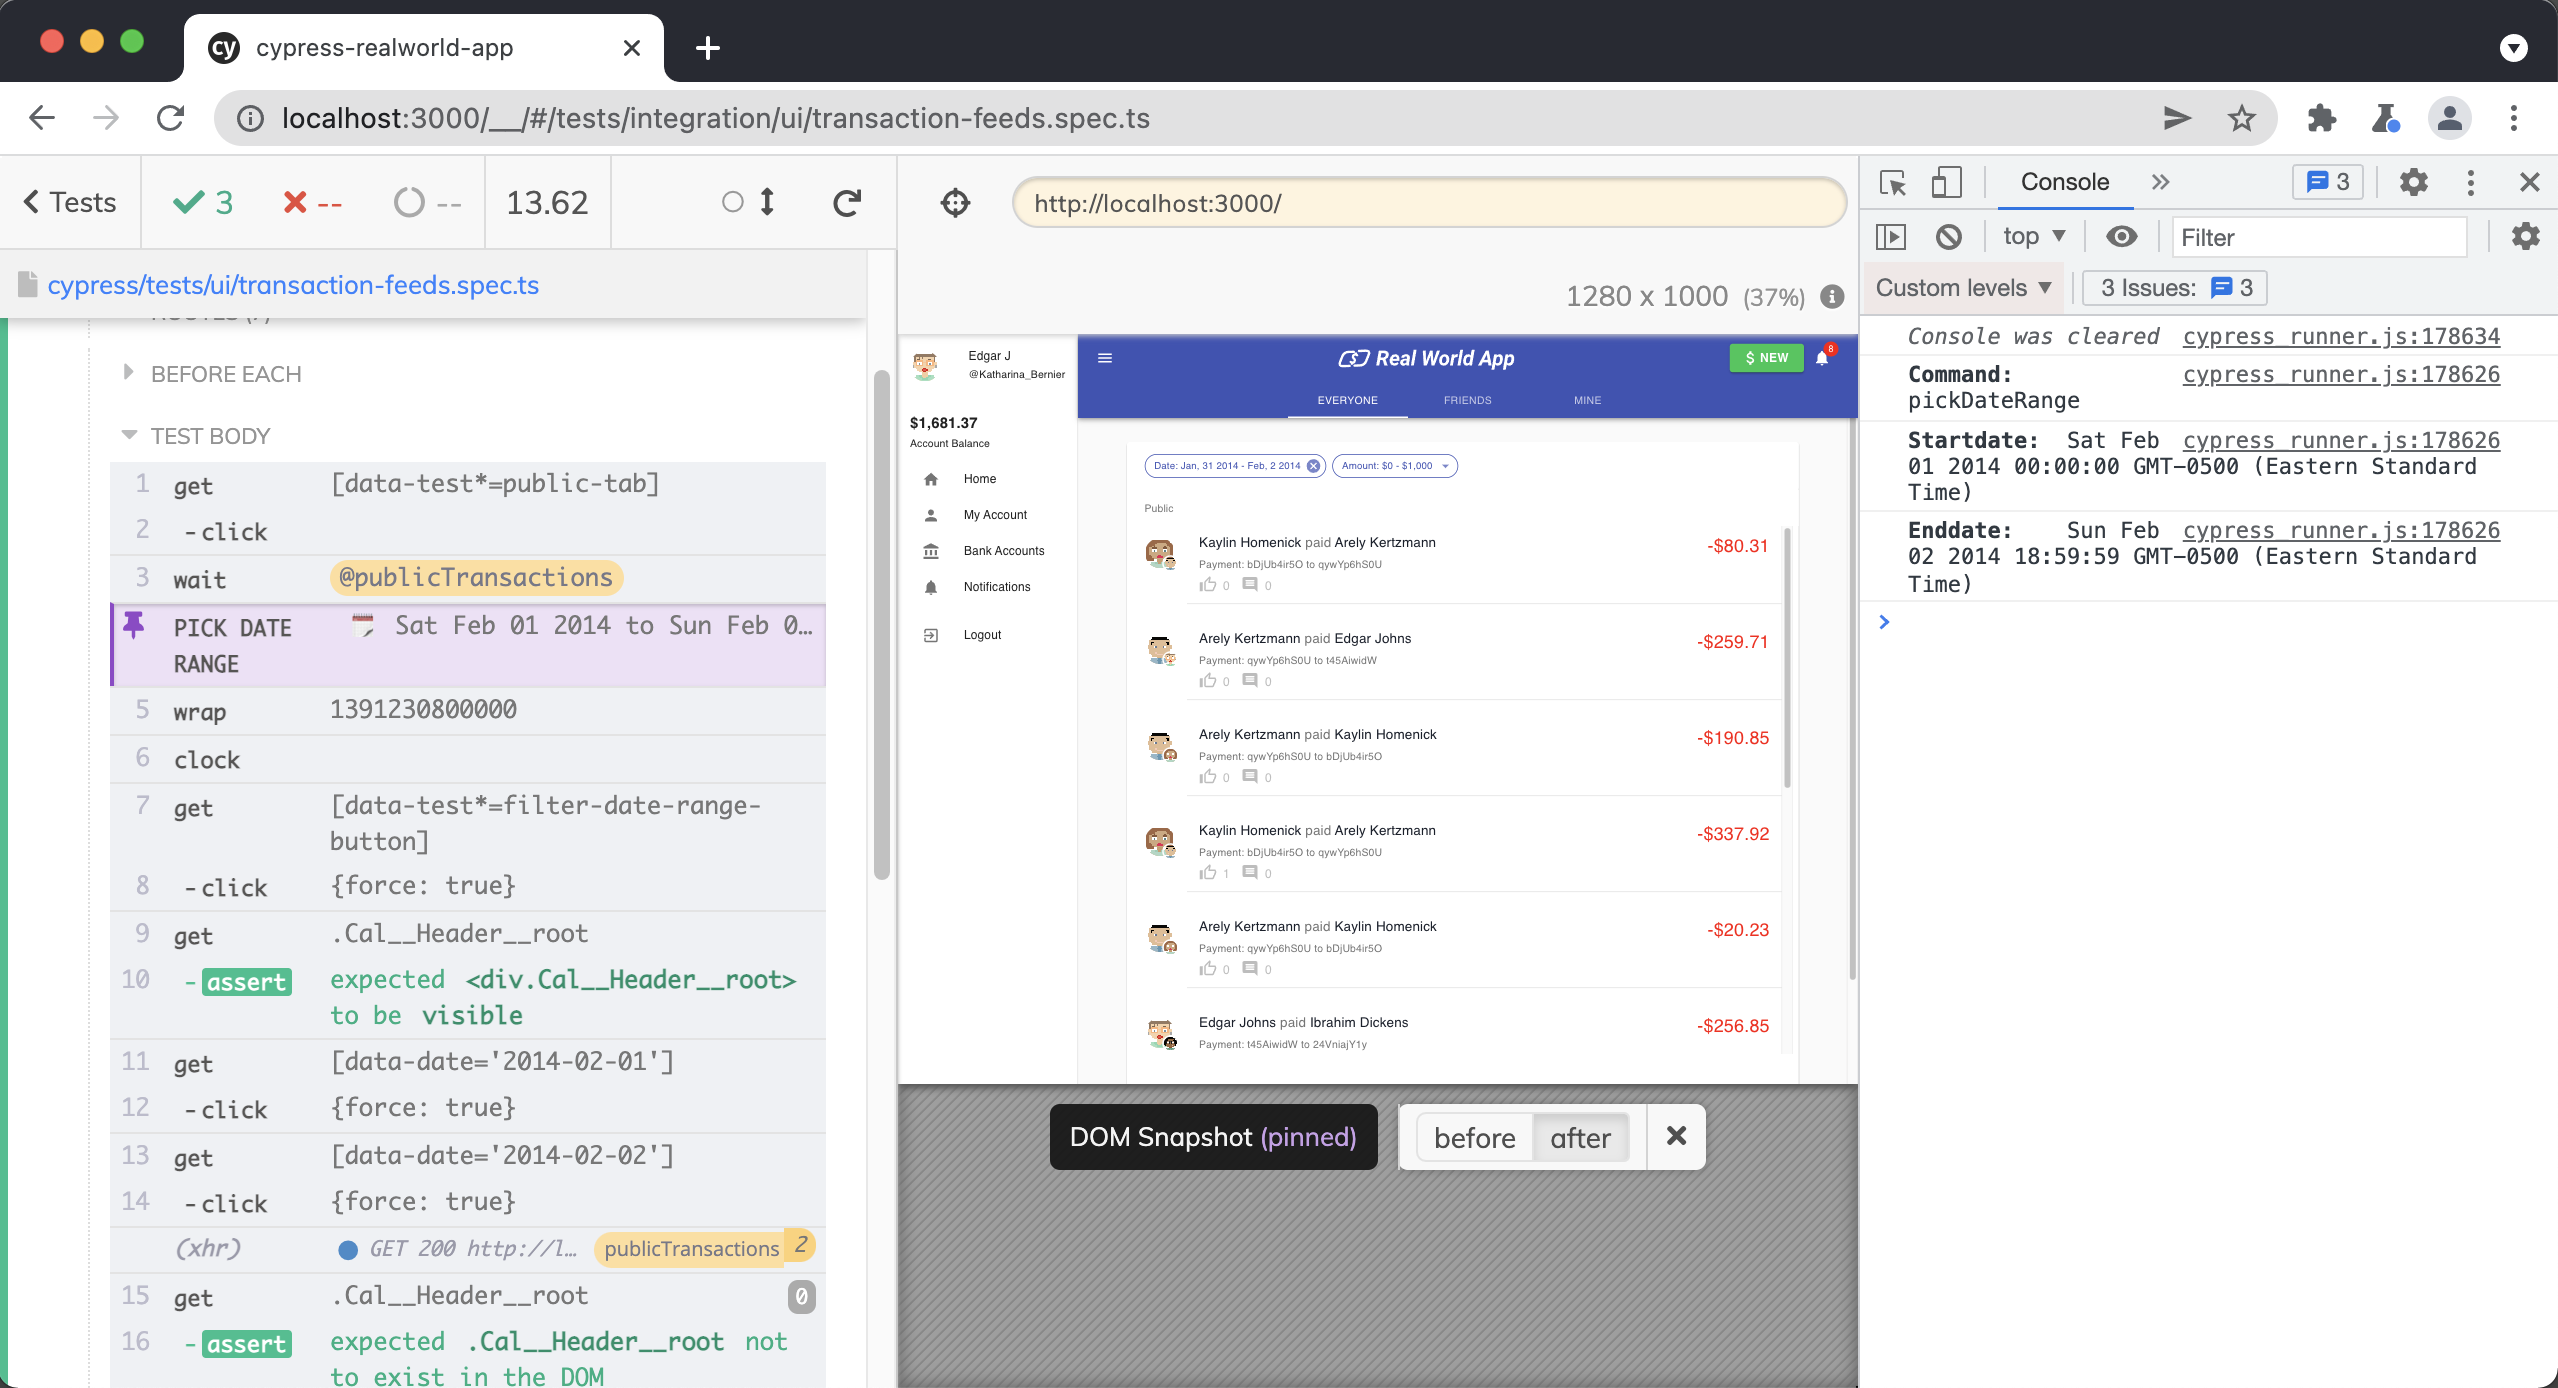
Next, we create a convenience function called selectDate, which gets the date picker and selects the date passed into it.
const selectDate = (date: number) => {
  return cy
    .get(`[data-date='${formatDate(date, "yyyy-MM-dd")}']`)
    .click({ force: true })
}
Then, we take a DOM snapshot and using cy.clock() to set the current time based upon our start date.
log.snapshot("before")
// Focus initial viewable date picker range around target start date
// @ts-ignore
cy.clock(startDate.getTime(), ["Date"])

Next, we click on the date range picker and assert that it is visible.
cy.getBySelLike("filter-date-range-button").click({ force: true })
cy.get(".Cal__Header__root").should("be.visible")
Then we use the selectDate function declared above to select both the starting and ending date of our range.
selectDate(startDate)
selectDate(endDate).then(() => {
  log.snapshot("after")
  log.end()
})
Finally, we assert that the date picker is closed after both dates are selected.
cy.get(".Cal__Header__root").should("not.exist")
cy.reactComponent()
Located in cypress/support/commands.ts .
Cypress.Commands.add("reactComponent", { prevSubject: "element" }, ($el) => {
  if ($el.length !== 1) {
    throw new Error(
      `cy.component() requires element of length 1 but got ${$el.length}`
    )
  }
  // Query for key starting with __reactInternalInstance$ for React v16.x
  //
  const key = Object.keys($el.get(0)).find((key) =>
    key.startsWith("__reactFiber$")
  )

  // @ts-ignore
  const domFiber = $el.prop(key)

  Cypress.log({
    name: "component",
    consoleProps() {
      return {
        component: domFiber,
      }
    },
  })

  return domFiber.return
})
This command allows us to get access to a React component's props, in order to programmatically interact with them.
For instance, in the setTransactionAmountRange command, we need to trigger the onChange event for our React component. Still, to do that, we need the actual component, not the DOM element that cy.get() would return us. cy.reactComponent() queries the previously chained element for the React Fiber instance to retrieve the props containing the onChange to call programmatically.
cy.setTransactionAmountRange()
Located in cypress/support/commands.ts .
Cypress.Commands.add("setTransactionAmountRange", (min, max) => {
  cy.getBySel("transaction-list-filter-amount-range-button")
    .scrollIntoView()
    .click({ force: true })

  return cy
    .getBySelLike("filter-amount-range-slider")
    .reactComponent()
    .its("memoizedProps")
    .invoke("onChange", null, [min / 10, max / 10])
})
First, we are getting the date range filter on the transaction page.
cy.getBySel("transaction-list-filter-amount-range-button")
  .scrollIntoView()
  .click({ force: true })
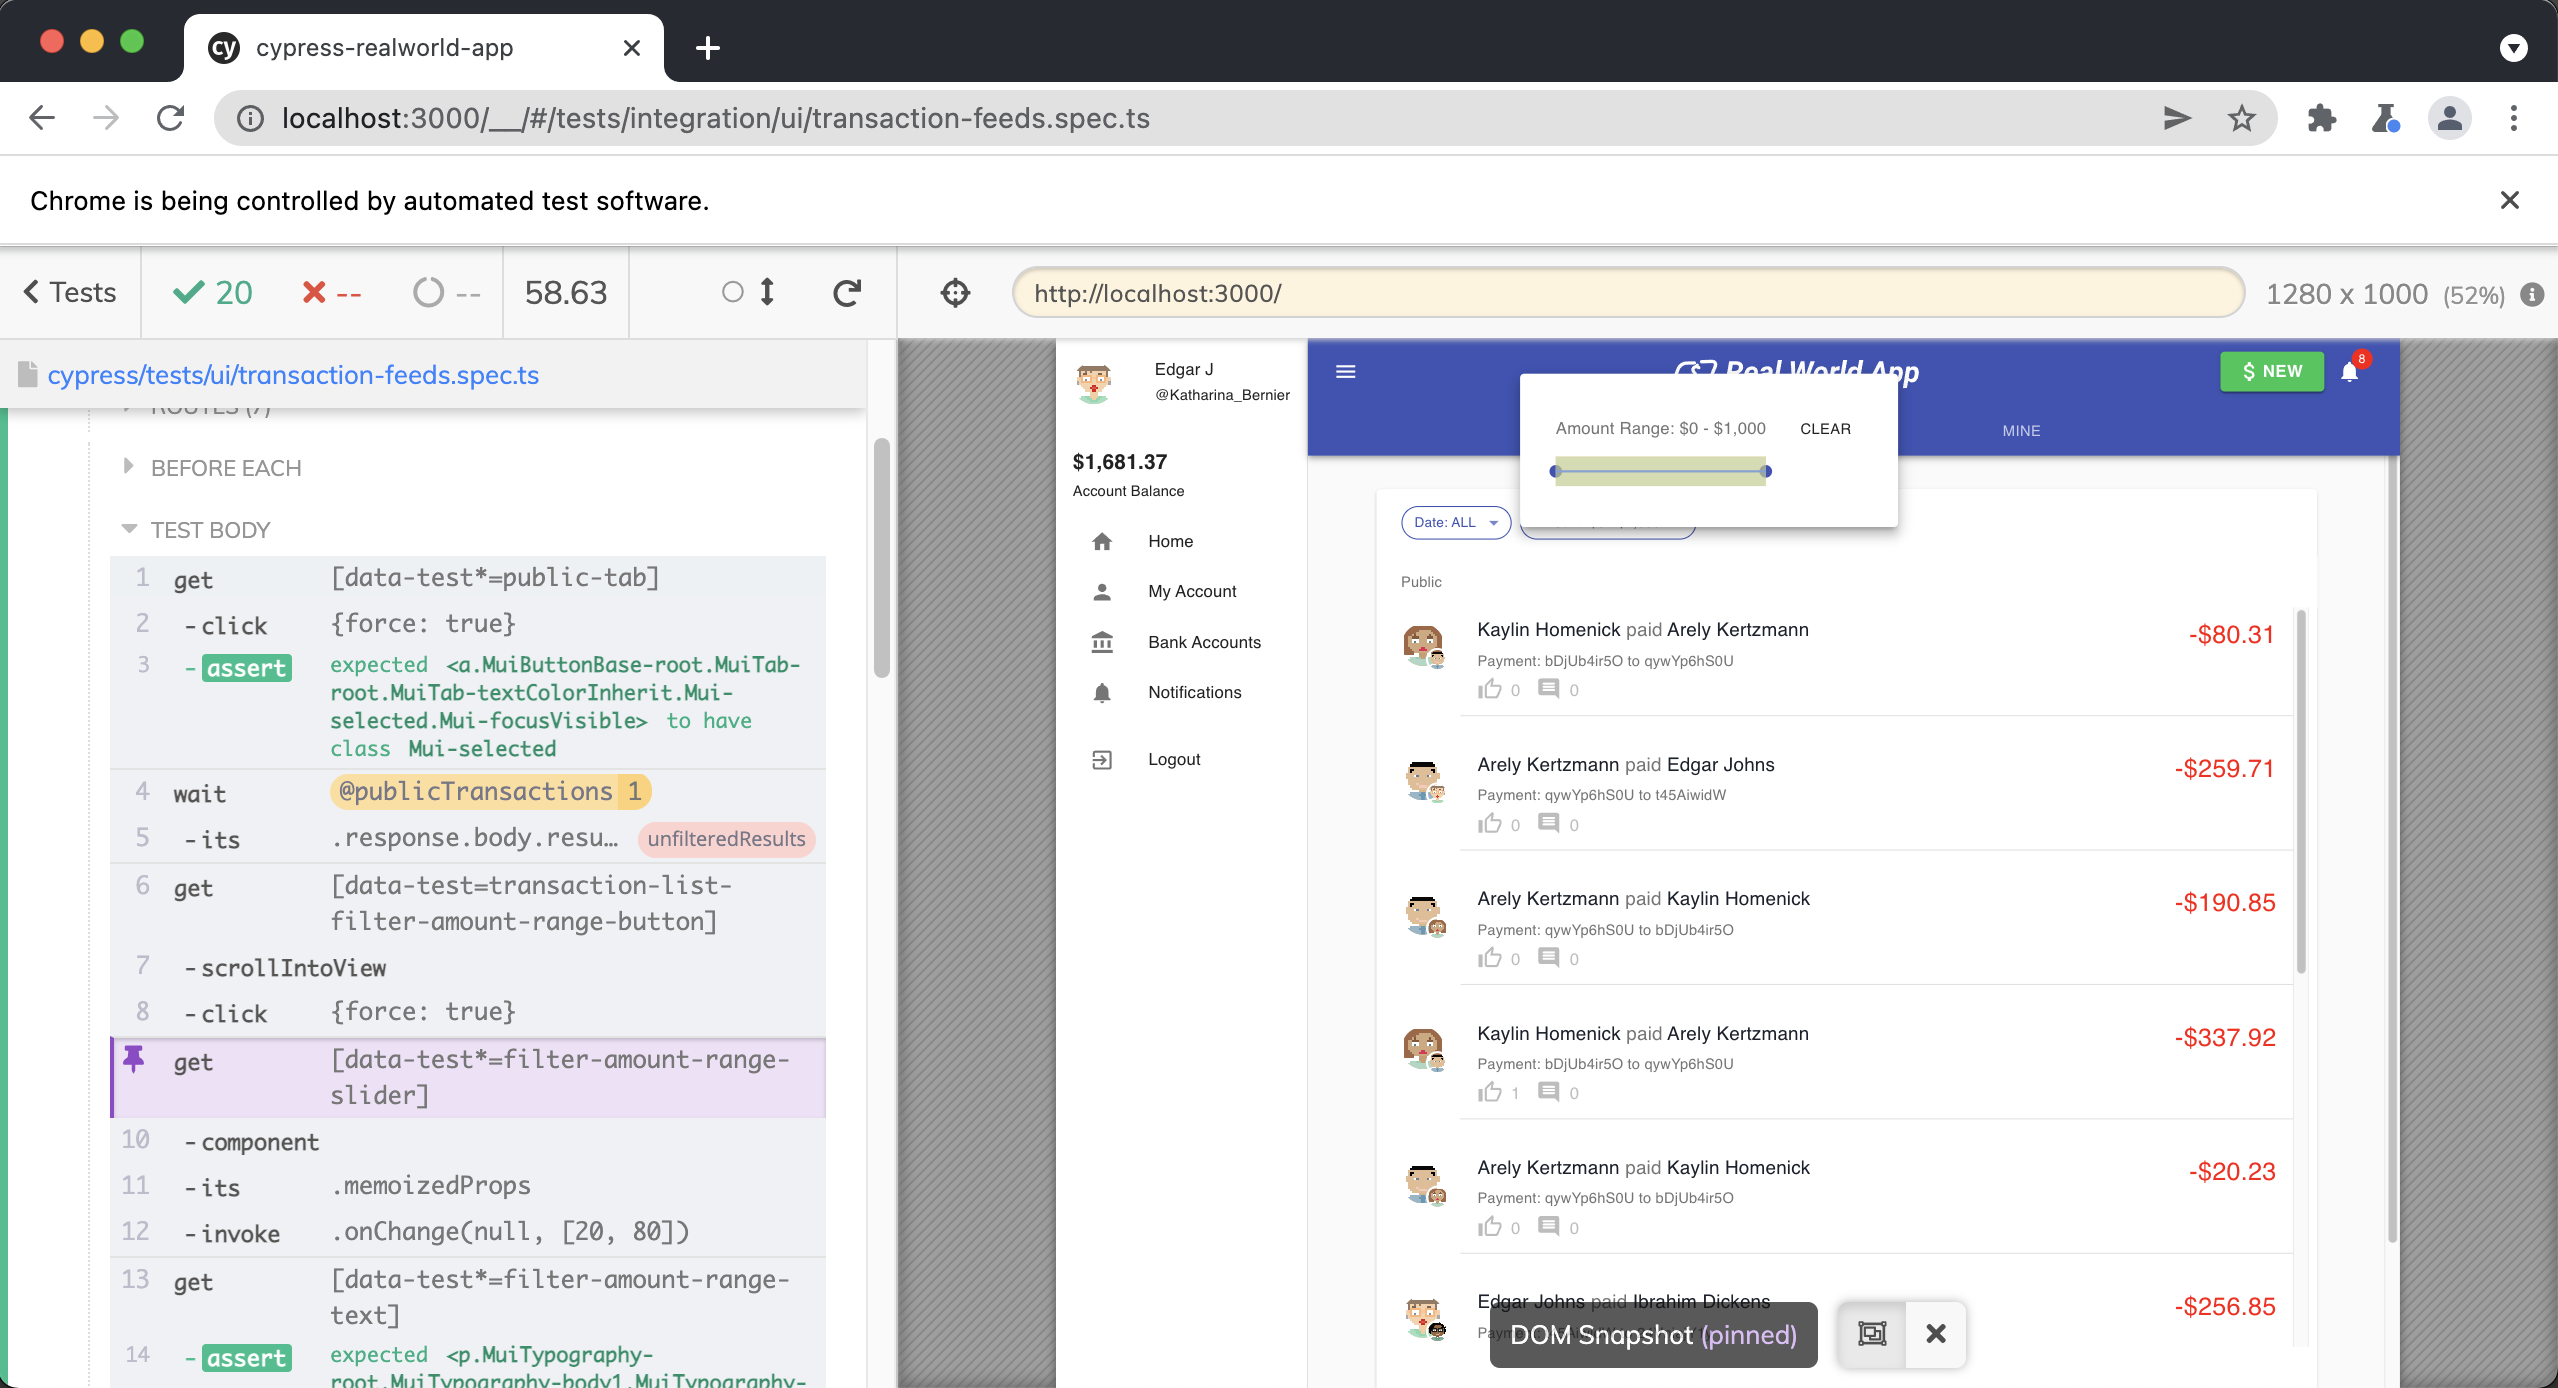
We then use the custom Cypress command cy.reactComponent() explained above, to set the min and max values of the slider. We are able to do this since the cy.reactComponent() command gives us access to the memoizedProps on the component which allows us to programmatically trigger the onChange() event setting the minimum and maximum values for the slider.
return cy
  .getBySelLike("filter-amount-range-slider")
  .reactComponent()
  .its("memoizedProps")
  .invoke("onChange", null, [min / 10, max / 10])
Example usage.
cy.setTransactionAmountRange(200, 800)

cy.switchUserByXstate()
Located in cypress/support/commands.ts .
Cypress.Commands.add("switchUserByXstate", (username) => {
  cy.logoutByXstate()
  return cy.loginByXstate(username).then(() => {
    if (isMobile()) {
      cy.getBySel("sidenav-toggle").click()
      cy.getBySel("sidenav-username").contains(username)
      cy.getBySel("sidenav-toggle").click({ force: true })
    } else {
      cy.getBySel("sidenav-username").contains(username)
    }
    cy.getBySel("list-skeleton").should("not.exist")
    cy.getBySelLike("transaction-item").should("have.length.greaterThan", 1)
  })
})
We have two custom Cypress commands called cy.logoutByXstate() and cy.loginByXstate() . This command utilizes both to log out the current user and then log in as a new user, whose username we pass in when we invoke this command.
We then use our isMobile() utility function to determine if this test is being run inside a mobile viewport and click on the appropriate buttons.
if (isMobile()) {
  cy.getBySel("sidenav-toggle").click()
  cy.getBySel("sidenav-username").contains(username)
  cy.getBySel("sidenav-toggle").click({ force: true })
} else {
  cy.getBySel("sidenav-username").contains(username)
}
Finally, we write two assertions to ensure that the "list skeleton" on the transaction page is no longer in the DOM and that more than one transaction is displayed in the UI.
cy.getBySel("list-skeleton").should("not.exist")
cy.getBySelLike("transaction-item").should("have.length.greaterThan", 1)
cy.visualSnapshot()
Located in cypress/support/commands.ts .
Cypress.Commands.add("visualSnapshot", (maybeName) => {
  // @ts-ignore
  let snapshotTitle = cy.state("runnable").fullTitle()
  if (maybeName) {
    snapshotTitle = snapshotTitle + " - " + maybeName
  }
  cy.percySnapshot(snapshotTitle, {
    // @ts-ignore
    widths: [cy.state("viewportWidth")],
    // @ts-ignore
    minHeight: cy.state("viewportHeight"),
  })
})
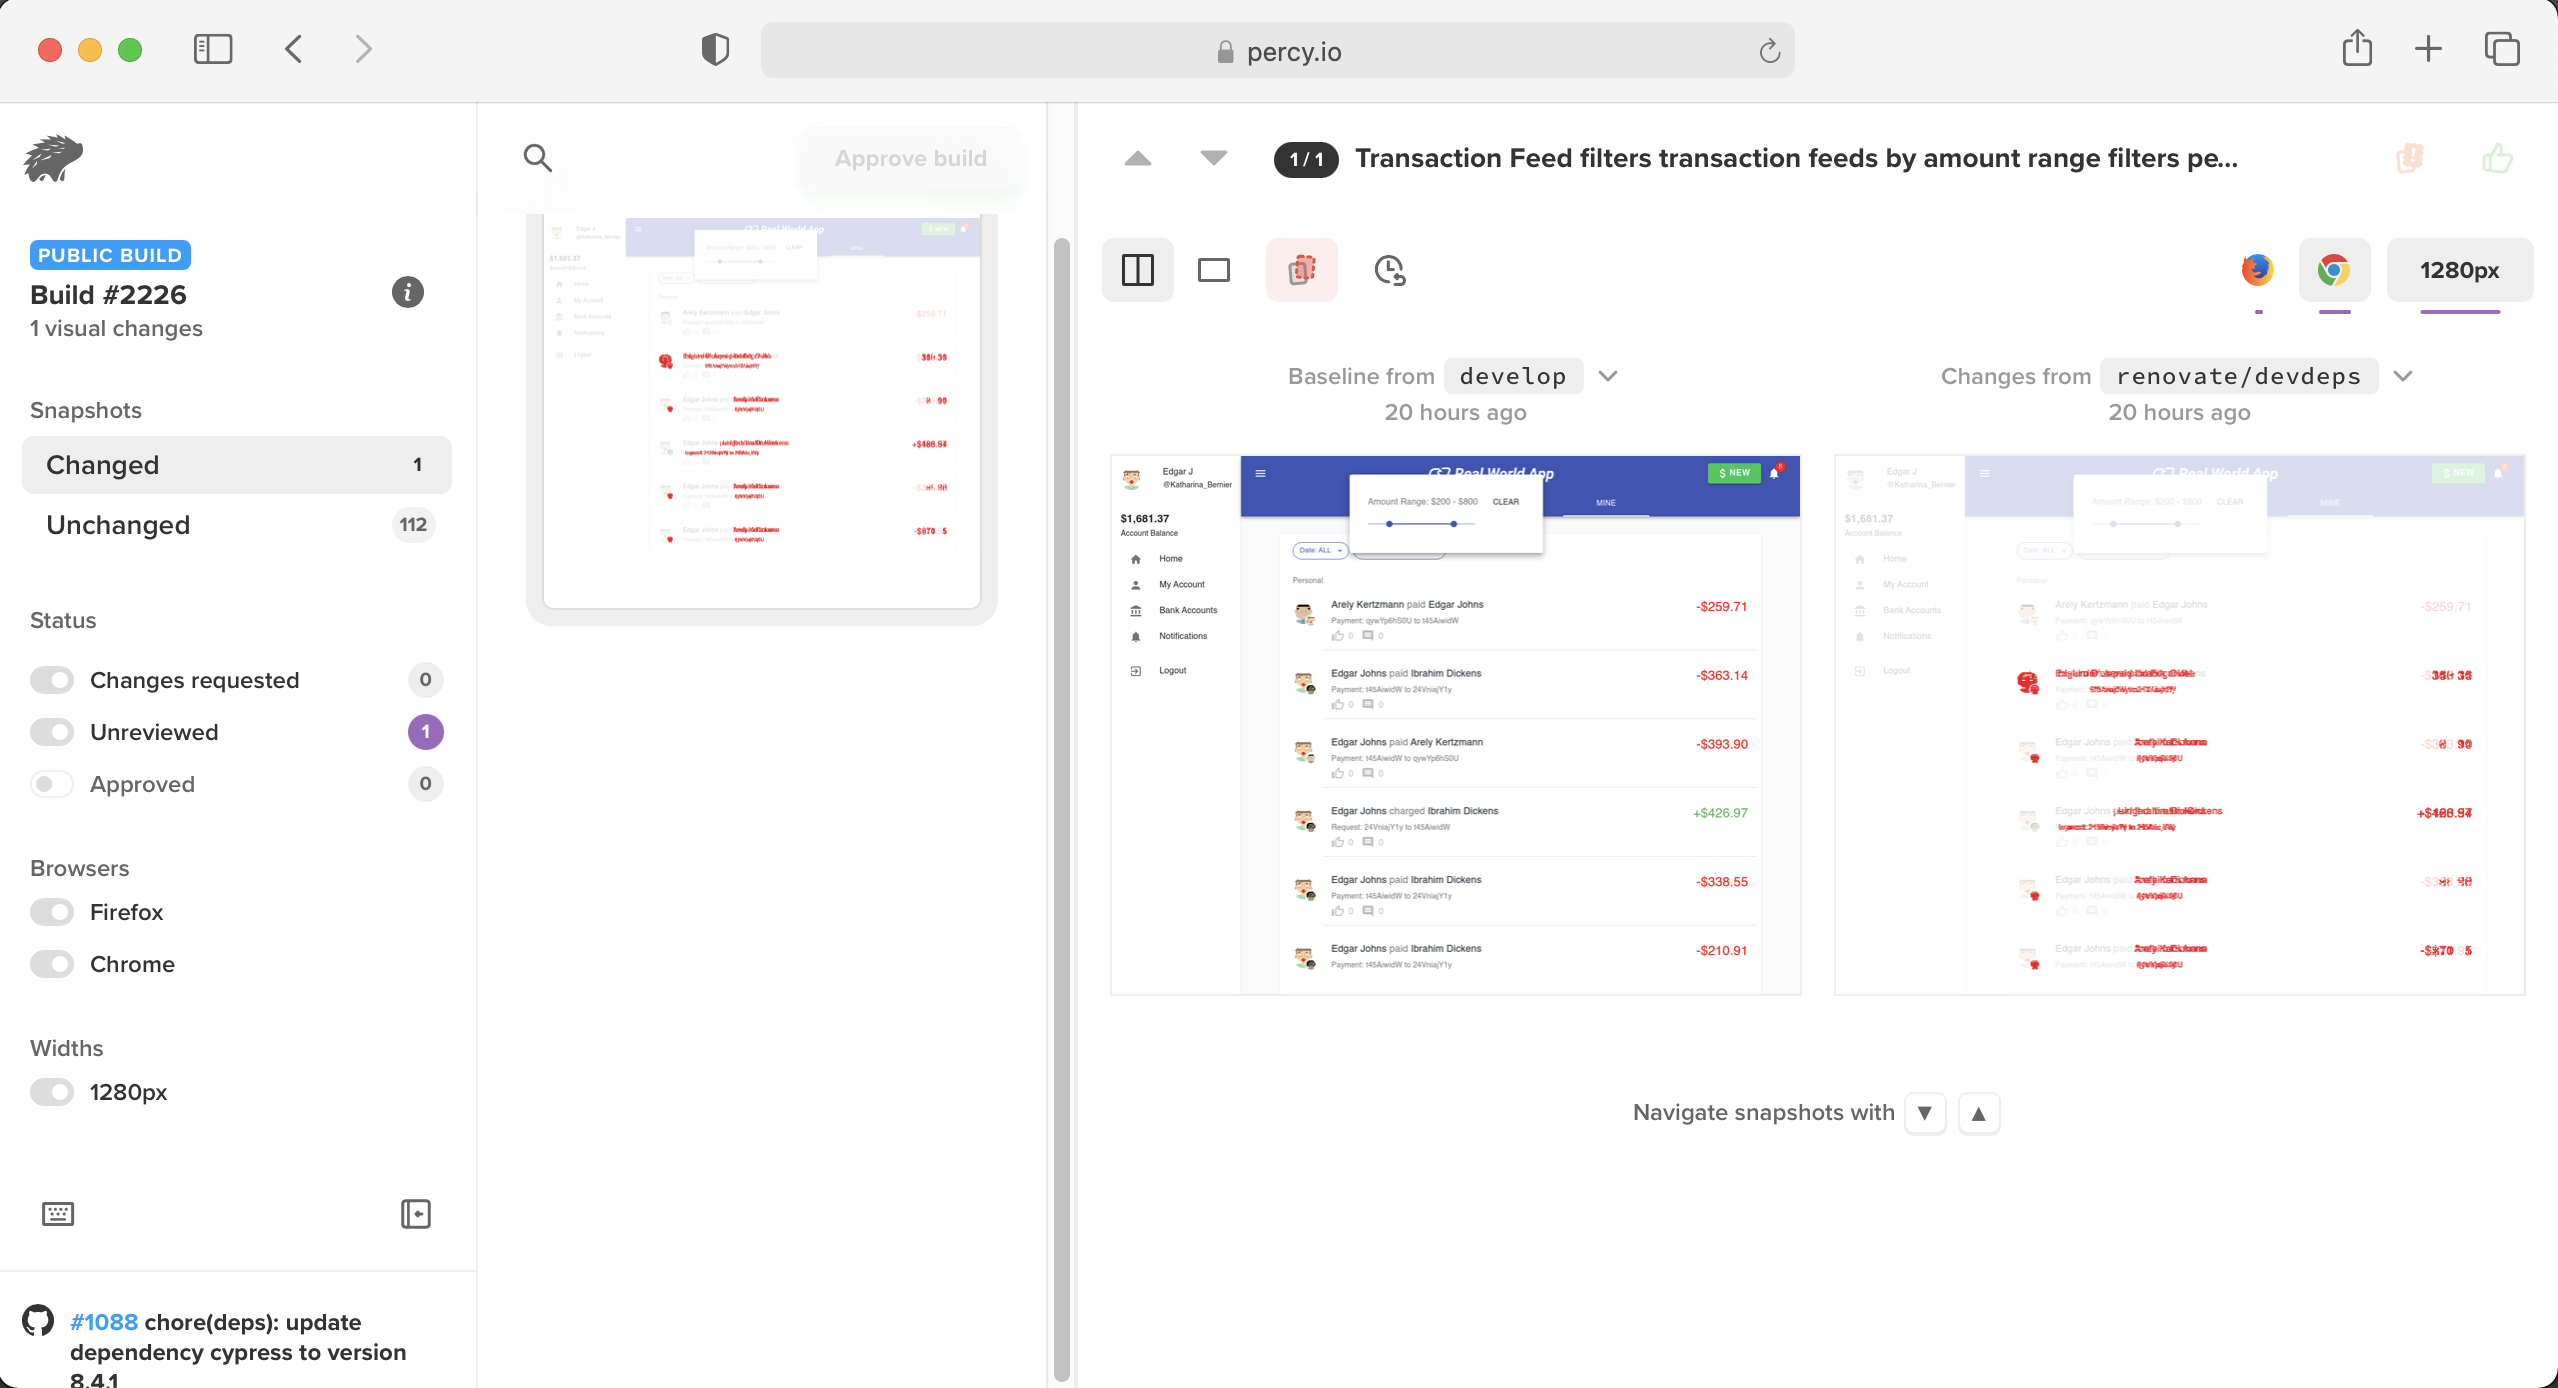
The Cypress Real World App (RWA) uses the cy.percySnapshot() command provided by the Cypress Percy plugin to take visual snapshots throughout the user journey end-to-end tests. You can learn more about using Percy with Cypress here.
First, we create a variable called snapshotTitle that creates a title for our visual snapshot.
let snapshotTitle = cy.state("runnable").fullTitle()
Next, if a string has been passed into our command, we append it to the end of our title.
if (maybeName) {
  snapshotTitle = snapshotTitle + " - " + maybeName
}
It is important that we provide a name for each snapshot and that each name is unique.
Finally, we take a snapshot using the cy.percySnapshot() command and pass in the snapshotTitle, width and minheight from our current viewport. The cy.percySnapshot() command comes from a package created by the Percy team called @percy/cypress and can be found here.
cy.percySnapshot(snapshotTitle, {
  // @ts-ignore
  widths: [cy.state("viewportWidth")],
  // @ts-ignore
  minHeight: cy.state("viewportHeight"),
})
cy.task("db:seed")
Registered in setupNodeEvents within the e2e block of cypress.config.ts .
async "db:seed"() {
  // seed database with test data
  const { data } = await axios.post(`${testDataApiEndpoint}/seed`);
  return data;
},
This task is responsible for making a request to an API endpoint, which triggers the backend to reseed the database. You will see this task quite frequently used within a beforeEach() so that we have freshly seeded data before each test is run. This reseeding technique is one of the strategies covered in the Database Initialization & Seeding lesson.
isMobile()
Located in cypress/support/utils.ts .
export const isMobile = () => {
  return (
    Cypress.config("viewportWidth") <
    Cypress.expose("mobileViewportWidthBreakpoint")
  )
}
This function is a utility function used throughout our Cypress tests to determine if the viewport is a mobile device or not.
Both of these values can be found inside the cypress.config.ts file in the root of the repo. mobileViewportWidthBreakpoint is non-sensitive, public configuration, so it lives under the expose key and is read in tests with Cypress.expose() (Cypress 15.10.0+).
export default defineConfig({
  projectId: "7s5okt",
  retries: {
    runMode: 2,
    openMode: 1,
  },
  expose: {
    apiUrl: "http://localhost:3001", // Cypress.expose("apiUrl")
    mobileViewportWidthBreakpoint: 414, // Cypress.expose("mobileViewportWidthBreakpoint")
    coverage: false,
    codeCoverage: {
      url: "http://localhost:3001/__coverage__",
    },
  },
  e2e: {
    baseUrl: "http://localhost:3000",
    specPattern: "cypress/tests/**/*.spec.{js,jsx,ts,tsx}",
    viewportHeight: 1000,
    viewportWidth: 1280, // Cypress.config("viewportWidth")
    experimentalStudio: true,
  },
})
This handy function will only be executed whenever our viewport width is less than 414px.
This allows the same test to be used in both Desktop and Mobile orientations instead of coding mobile-specific tests.